
Getting Started
Maple Dashboard Overview
A complete walkthrough of your Maple dashboard — what's where and how to use it.
Navigation
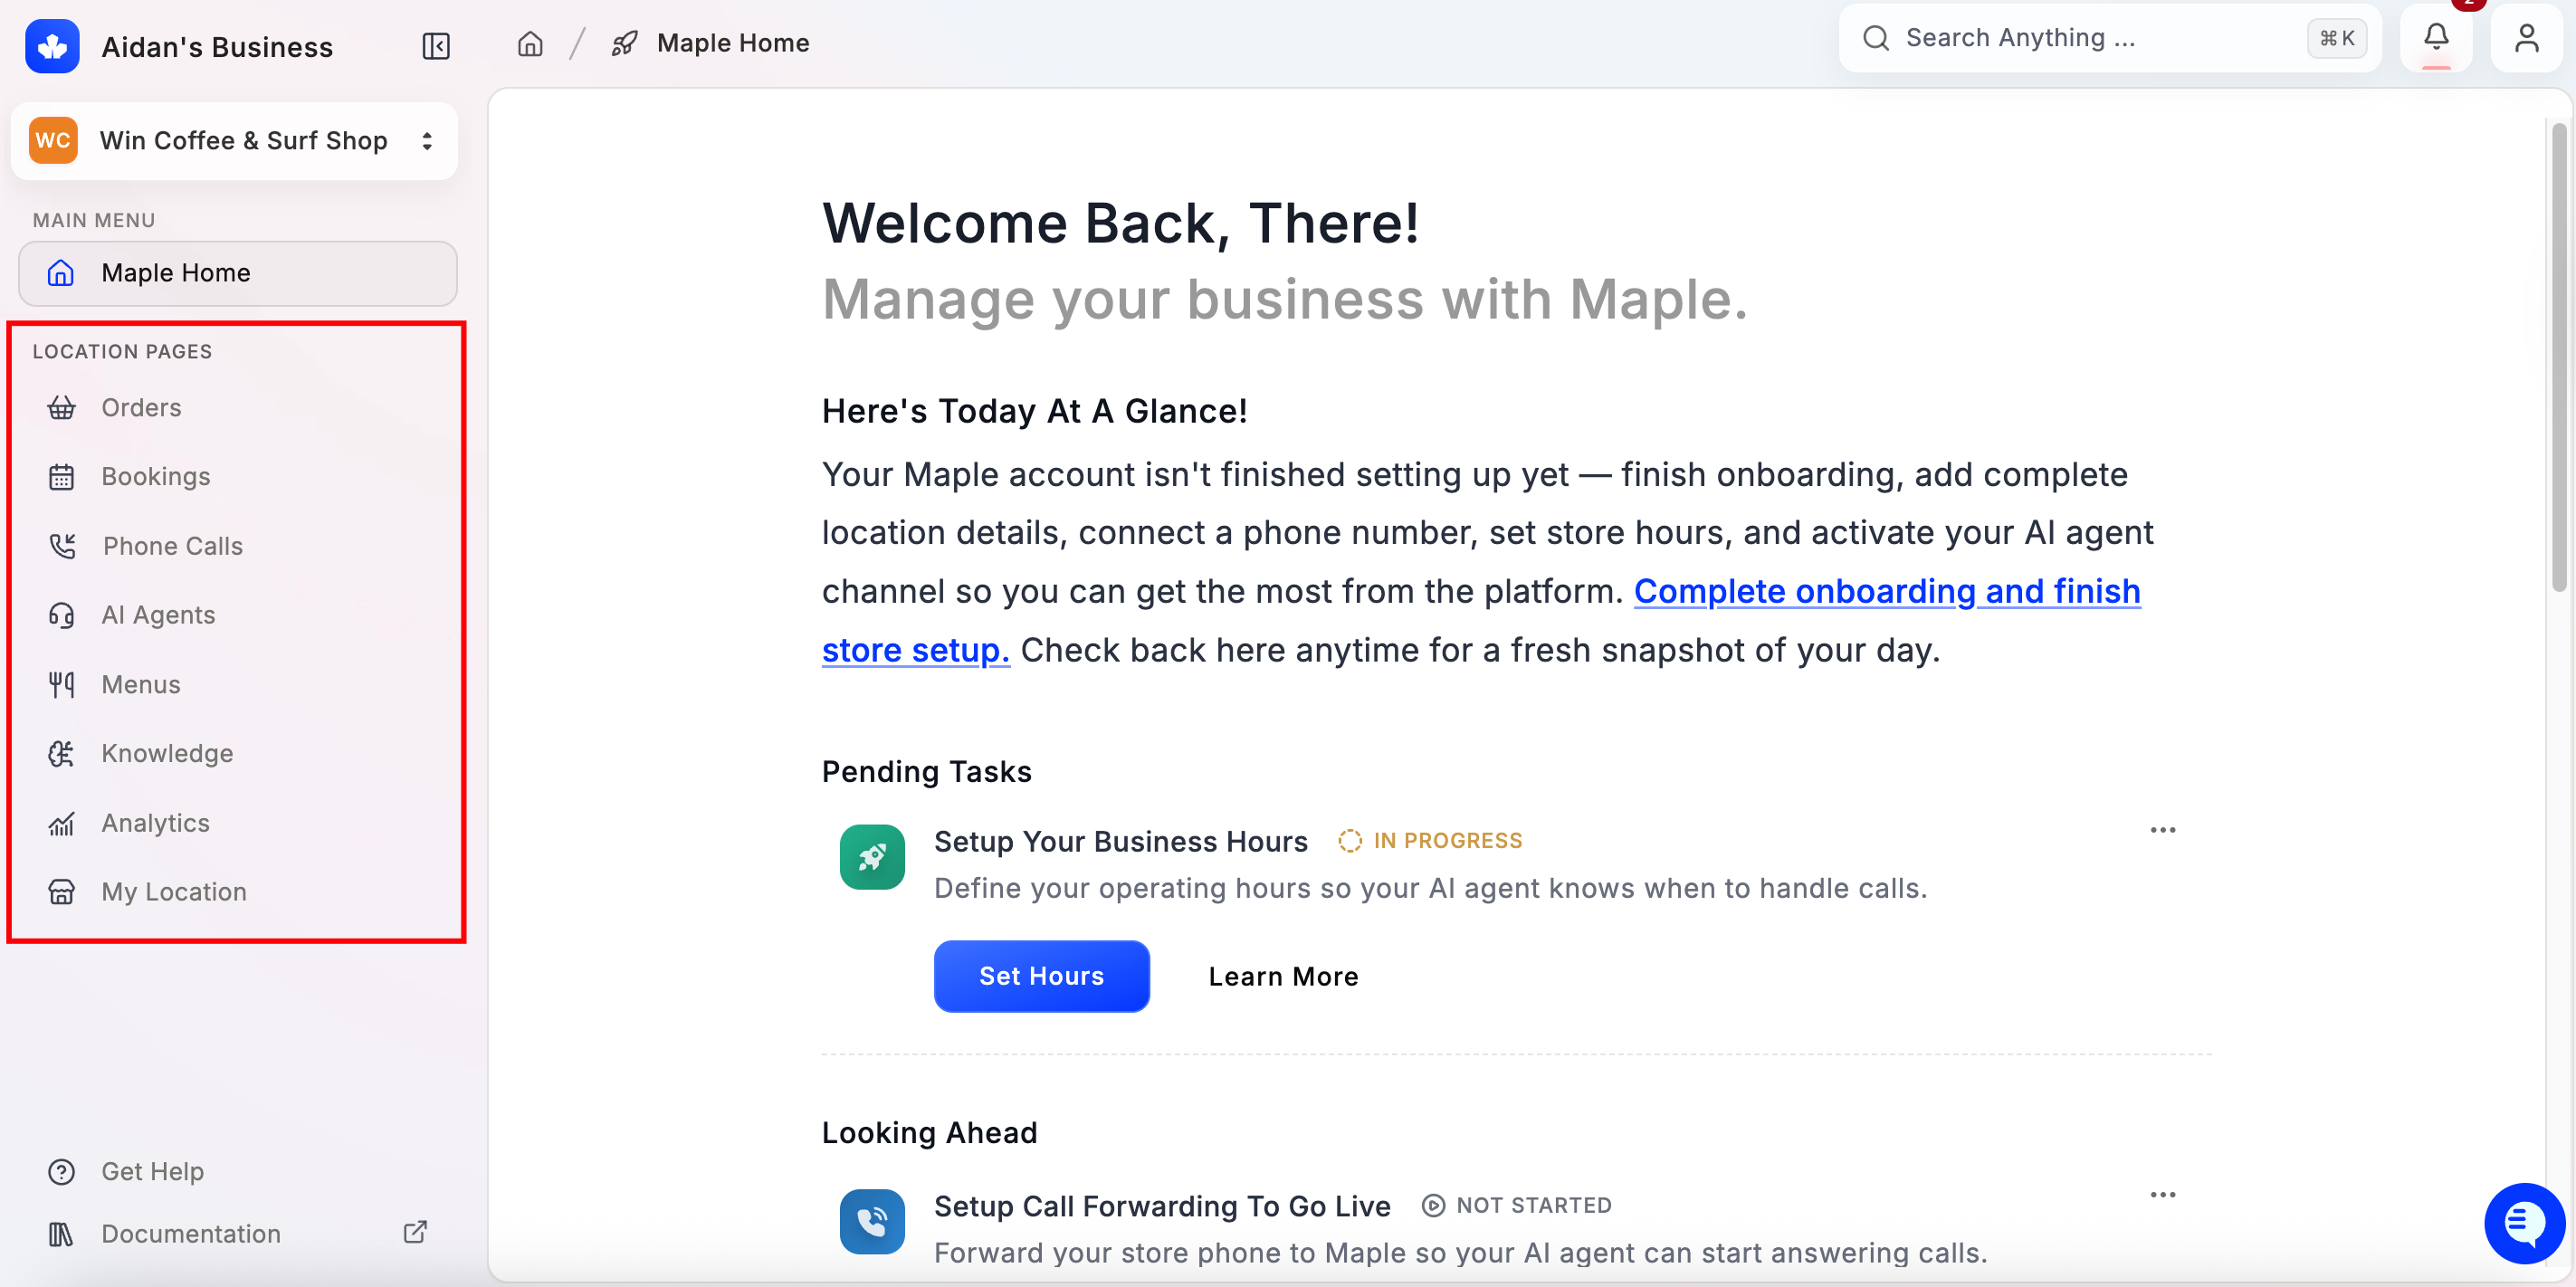
When you log into app.maple.inc you’ll see the sidebar on the left with two sections:
- Main Menu — top-level navigation across your account, including Maple Home and My Tasks
- Location Pages — everything specific to your active location: Orders, Bookings, Phone Calls, AI Agents, Menus, Knowledge, Analytics, and My Location
At the top of the sidebar, you’ll see your merchant name and your currently selected location.
If you have multiple locations, click the location name to switch between them. Each location page, including Analytics, shows data for the location you’ve selected.
The bell icon in the top-right corner shows a badge with your pending notifications: onboarding tasks, setup reminders, and merchant onboarding steps. Select Merchant Onboarding to jump back into pending setup steps, including your POS connection.
Maple Home
The home screen gives you a snapshot of your account status and any pending tasks.
- Pending Tasks — items still needed before you’re fully live (e.g., setting business hours, enabling call forwarding)
- Looking Ahead — upcoming actions like going live
If you see a “Complete onboarding” prompt, click it to finish any remaining setup steps before moving forward. While a key step is missing, a banner across the top of the dashboard (for example, Setup Your First AI Agent For your location) links straight to it. Setup progress is saved automatically, and the onboarding prompts disappear once onboarding is complete.
Location Pages
Step 1 — Orders: Connect Your POS
Click Orders in the sidebar. If your POS isn’t connected yet, you’ll see a setup flow with three steps:
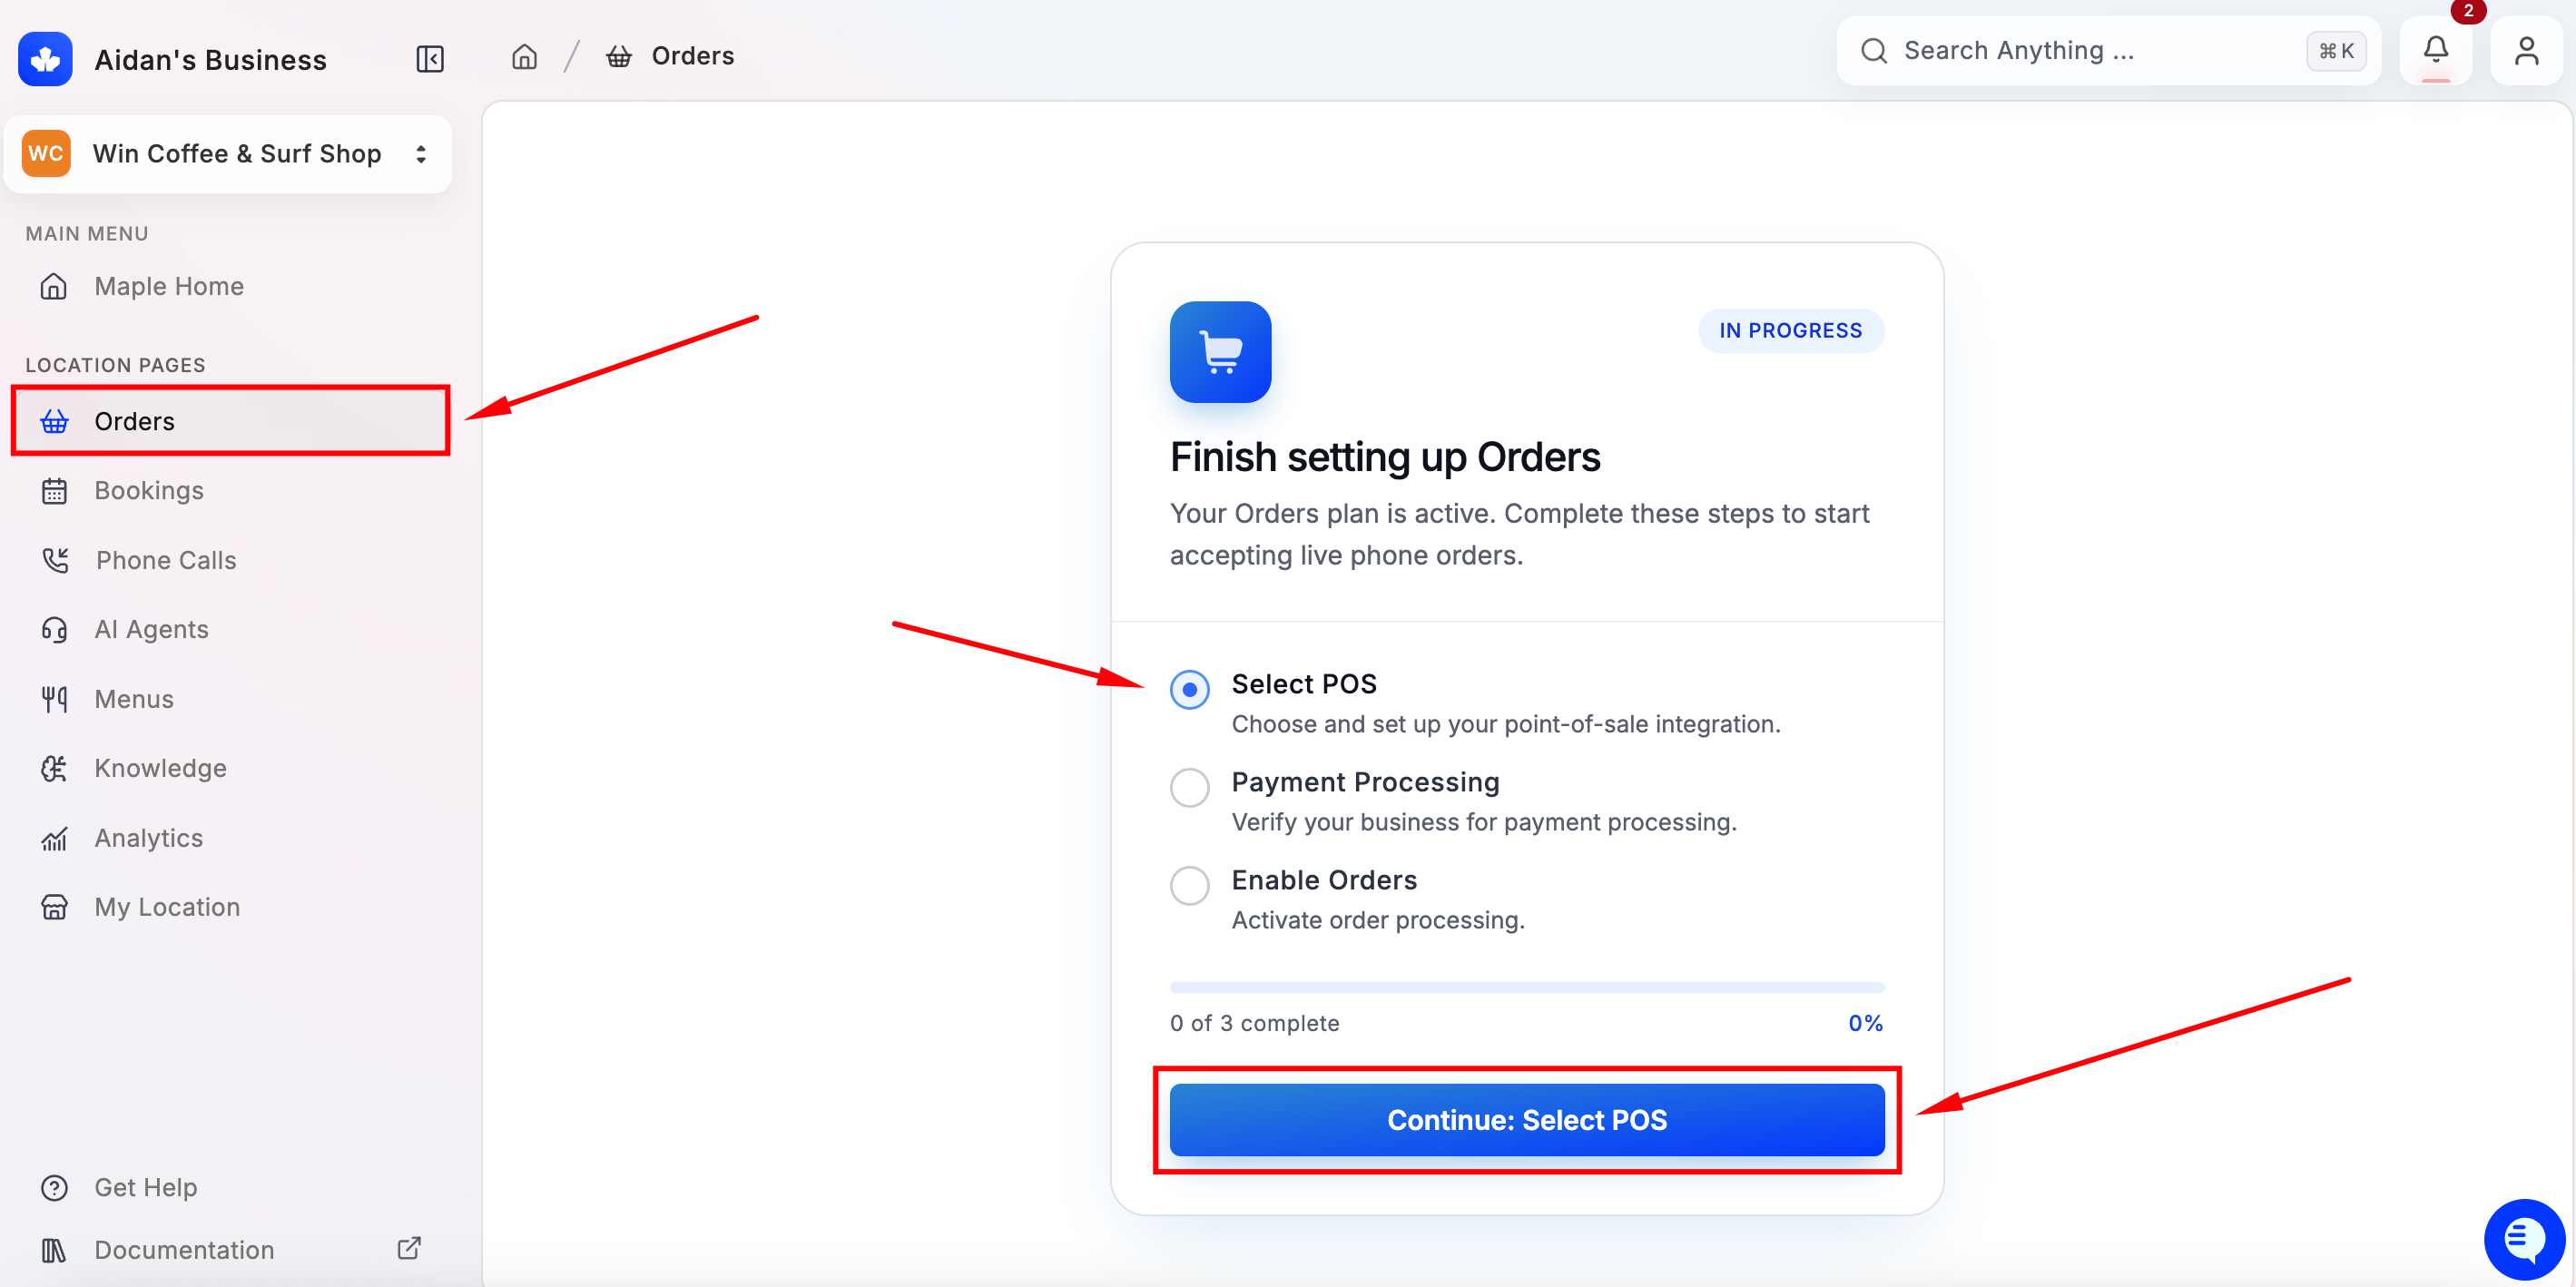
- Select POS — choose and connect your point-of-sale system
- Payment Processing — verify your business for payment processing. For many POS systems this is business verification (KYC) through Stripe: business details, EIN, the principal owner’s personal details, and your bank routing and account numbers. Some POS systems handle payments their own way and skip this (see KYC requirements).
- Enable Orders — activate order processing
Click Continue: Select POS to begin.
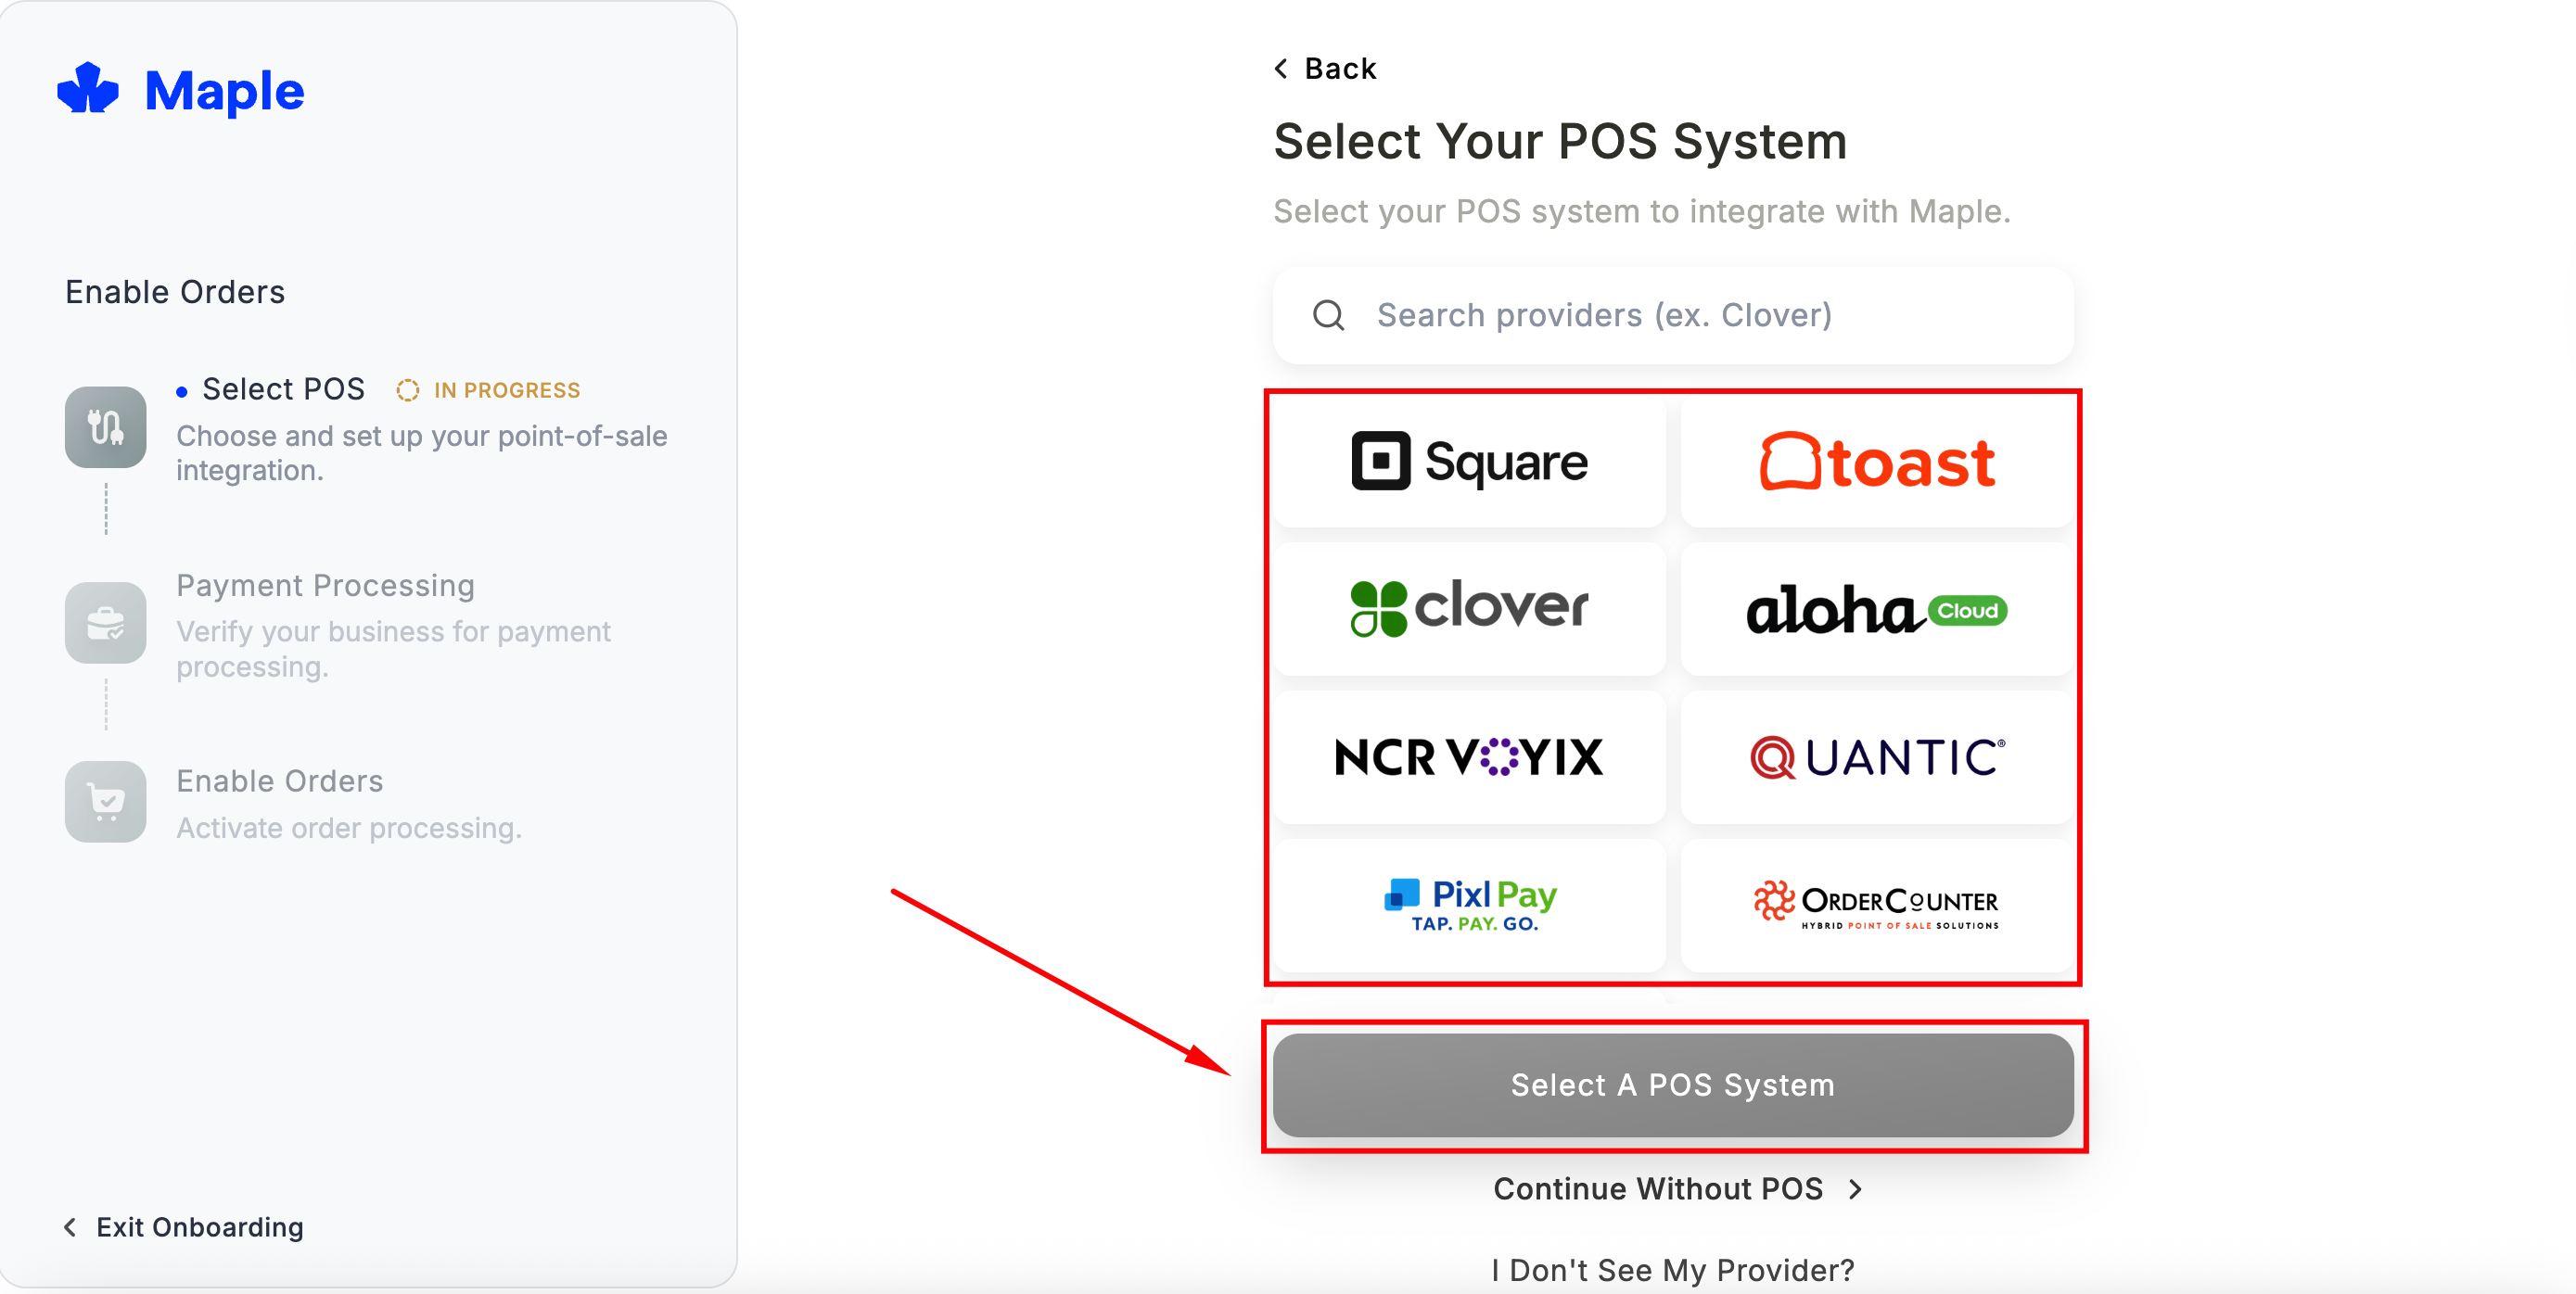
You’ll be redirected to a POS selection page showing all supported integrations — including Square, Toast, Clover, Aloha Cloud, NCR Voyix, Quantic, OrderCounter, and more.
Select your POS system. Maple will redirect you to your POS provider’s page, where you’ll find the Maple integration — install it from there to complete the connection.
If you don’t use a POS, click Continue Without POS. You can send the Maple team a PDF of your menu and they’ll convert and upload it for you; this typically takes a couple of days. If your provider isn’t listed, click I Don’t See My Provider to let us know.
Once the integration is complete, your menu will automatically populate from your POS into your Maple dashboard.
Step 2 — Menus: Review Your Menu
Click Menus in the sidebar to review the menu that synced from your POS.
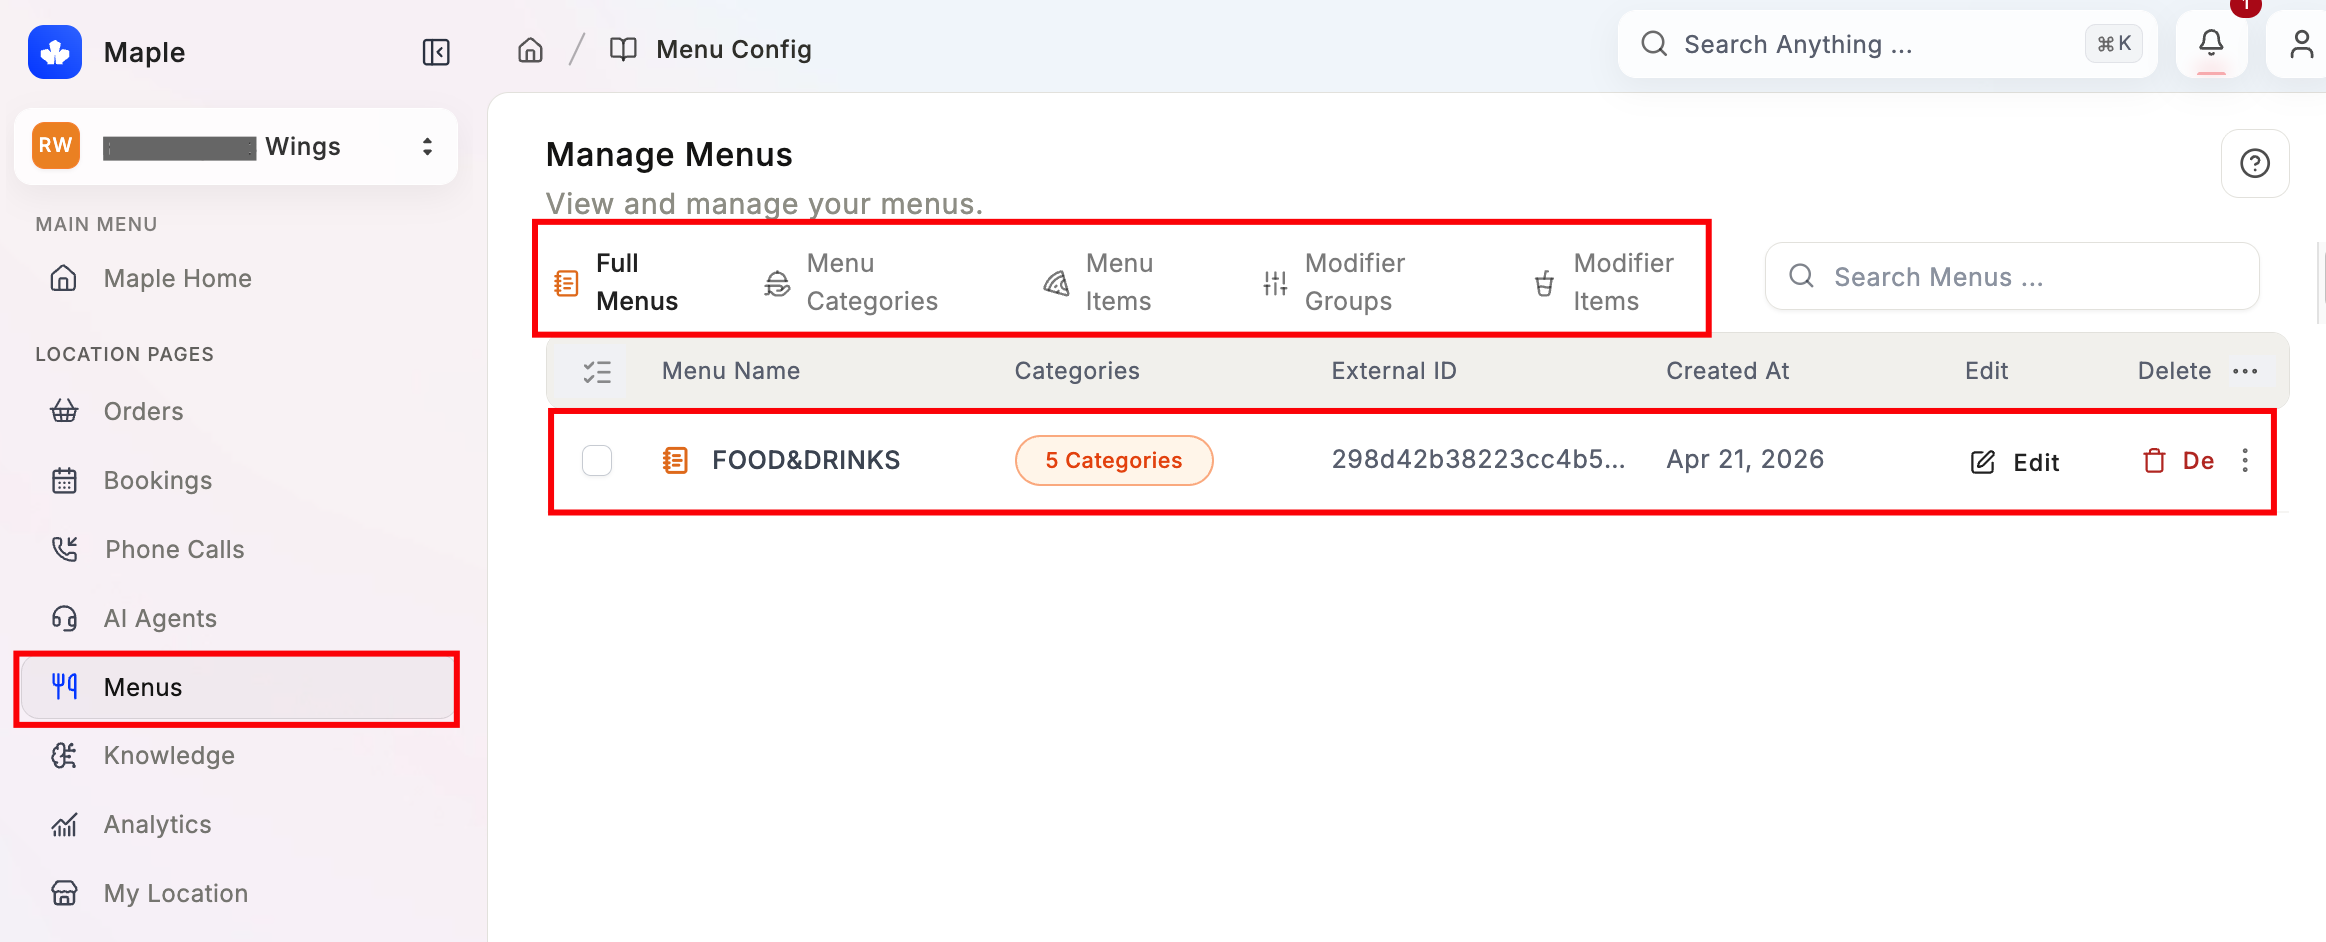
The menu is organized into five tabs:
- Full Menus — top-level menus (e.g. Food & Drinks)
- Menu Categories — sections within a menu (e.g. Appetizers, Mains)
- Menu Items — individual items
- Modifier Groups — groups of modifiers (e.g. sauce choices)
- Modifier Items — individual modifier options
What to check after syncing:
- Item names are clear and customer-facing
- Descriptions are accurate
- Modifiers, pricing, and tax are correct
- Items you don’t want available are disabled
- Only the POS menus you want the agent to use are selected
You can also bulk-update items and pricing from this tab.
Menu Hours vs. Store Hours
There are two separate hour settings in Maple, and it’s important to understand the difference:
- Store Hours — your general restaurant operating hours, visible to customers. These will be displayed in “My Location.”
- Menu Hours — the hours during which your Maple agent will actually accept orders. If a customer calls outside your menu hours, the agent will let them know the kitchen isn’t currently taking orders.
Make sure your menu hours match the window when you actually want to accept phone orders. These are set under each menu in the Menus tab. Just click on Edit > Availability to adjust the menu hours.
Menu accuracy directly impacts order accuracy. If something is wrong in the menu, the AI will get it wrong on calls. Always review after a sync before going live.
Step 3 — Orders Tab
Once your POS is connected, orders taken by your Maple agent will appear here.
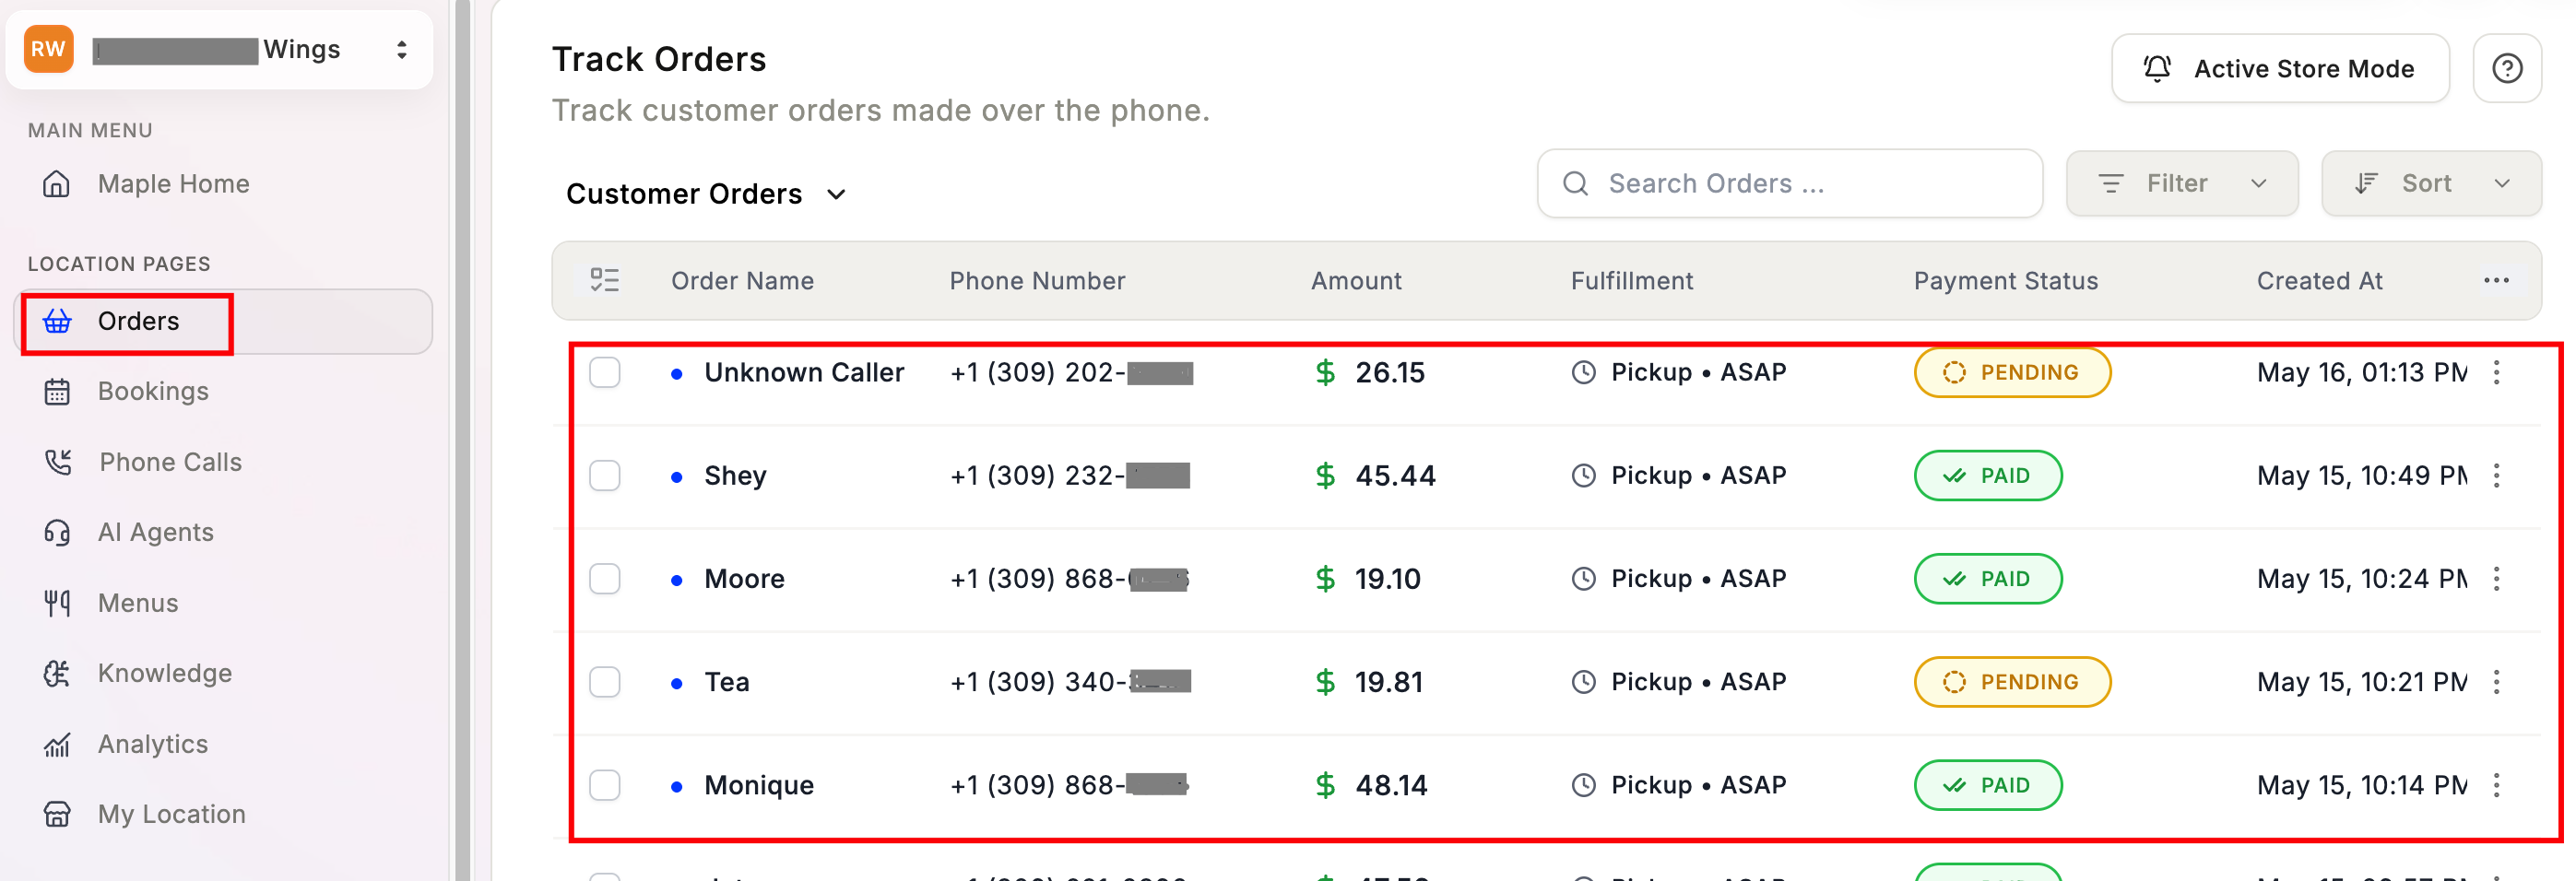
The Track Orders list shows:
- Order name — customer’s name
- Phone number — caller’s number
- Amount — order total
- Fulfillment — pickup or delivery, ASAP or scheduled
- Payment status — Paid or Pending
- Created at — date and time
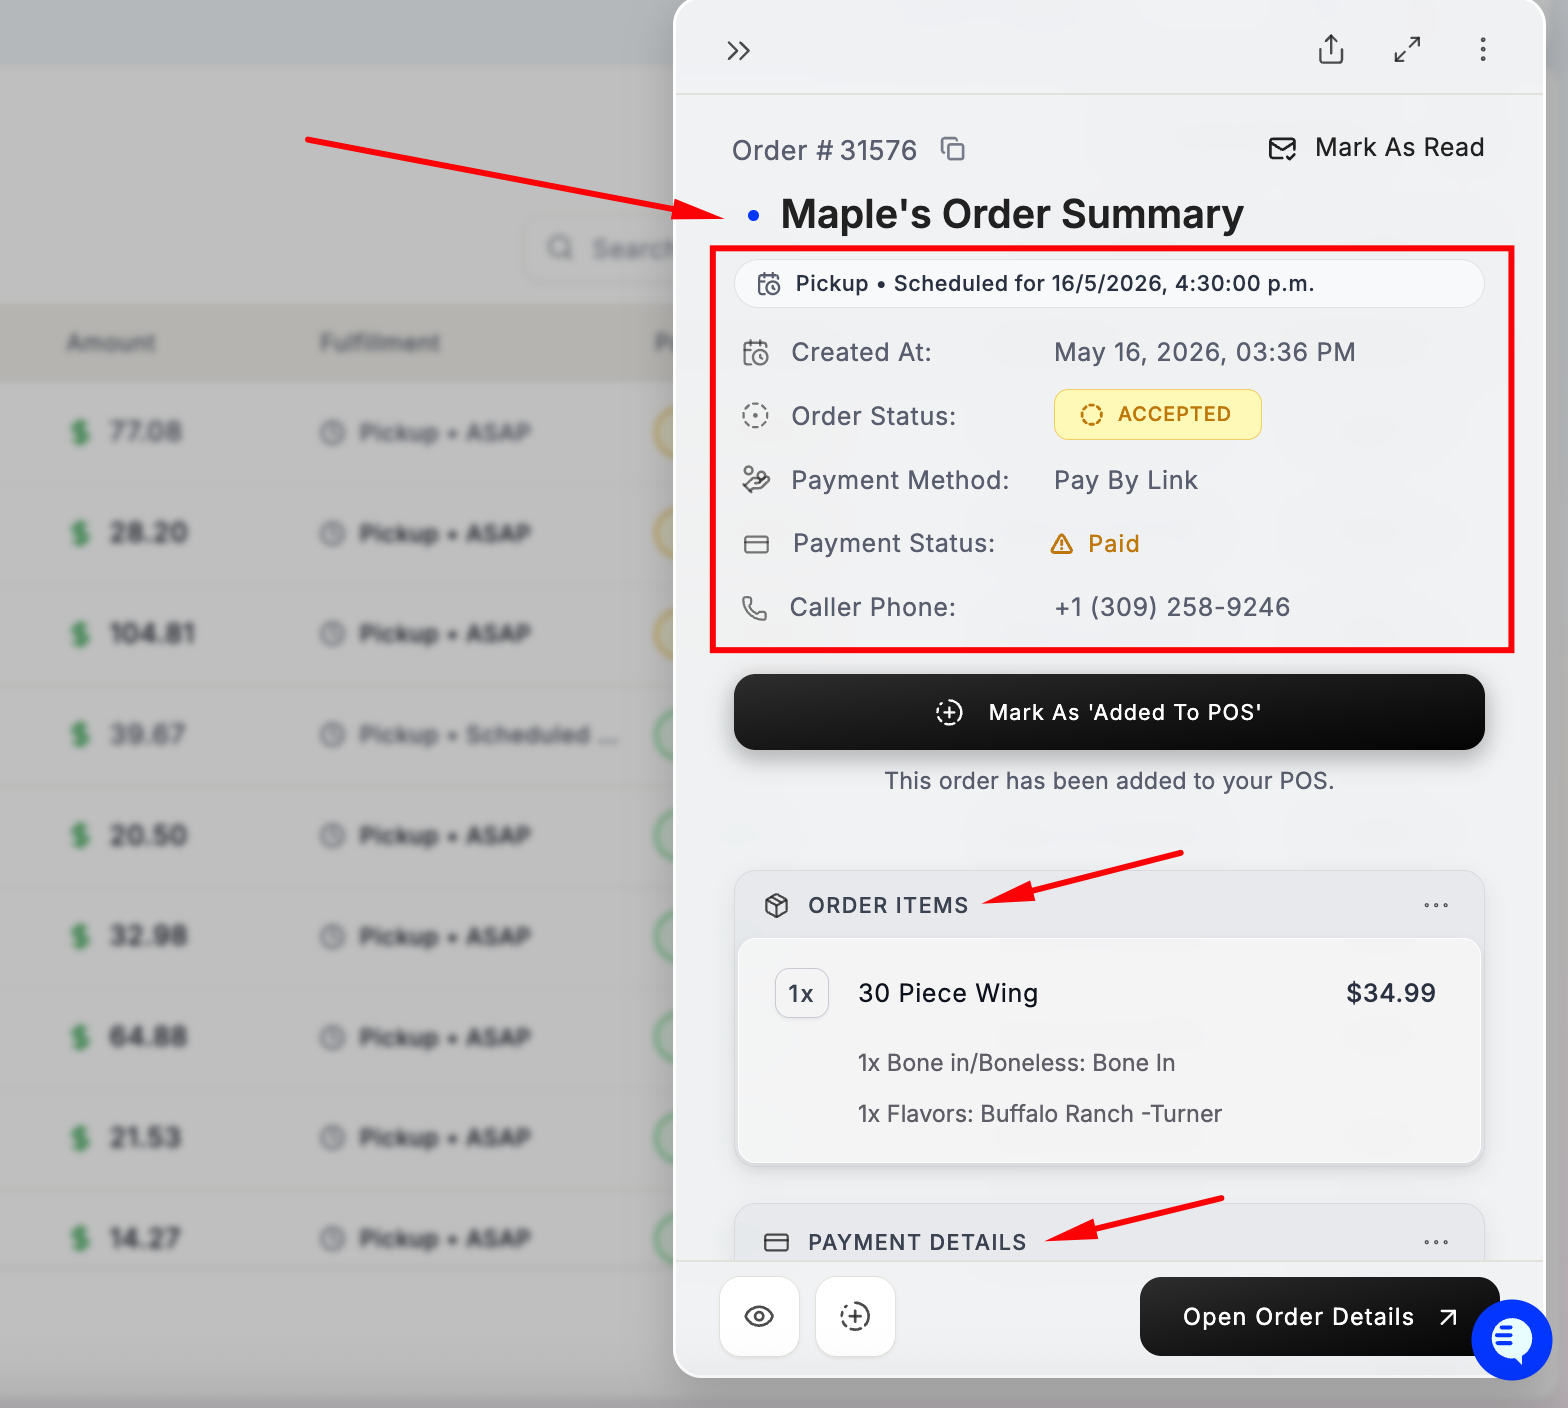
Click any order to open the Order Summary, which shows the full order details including items, modifiers, payment method, fulfillment time, and caller phone number.
Step 4 — Bookings (if enabled)
Click Bookings to manage phone reservations.
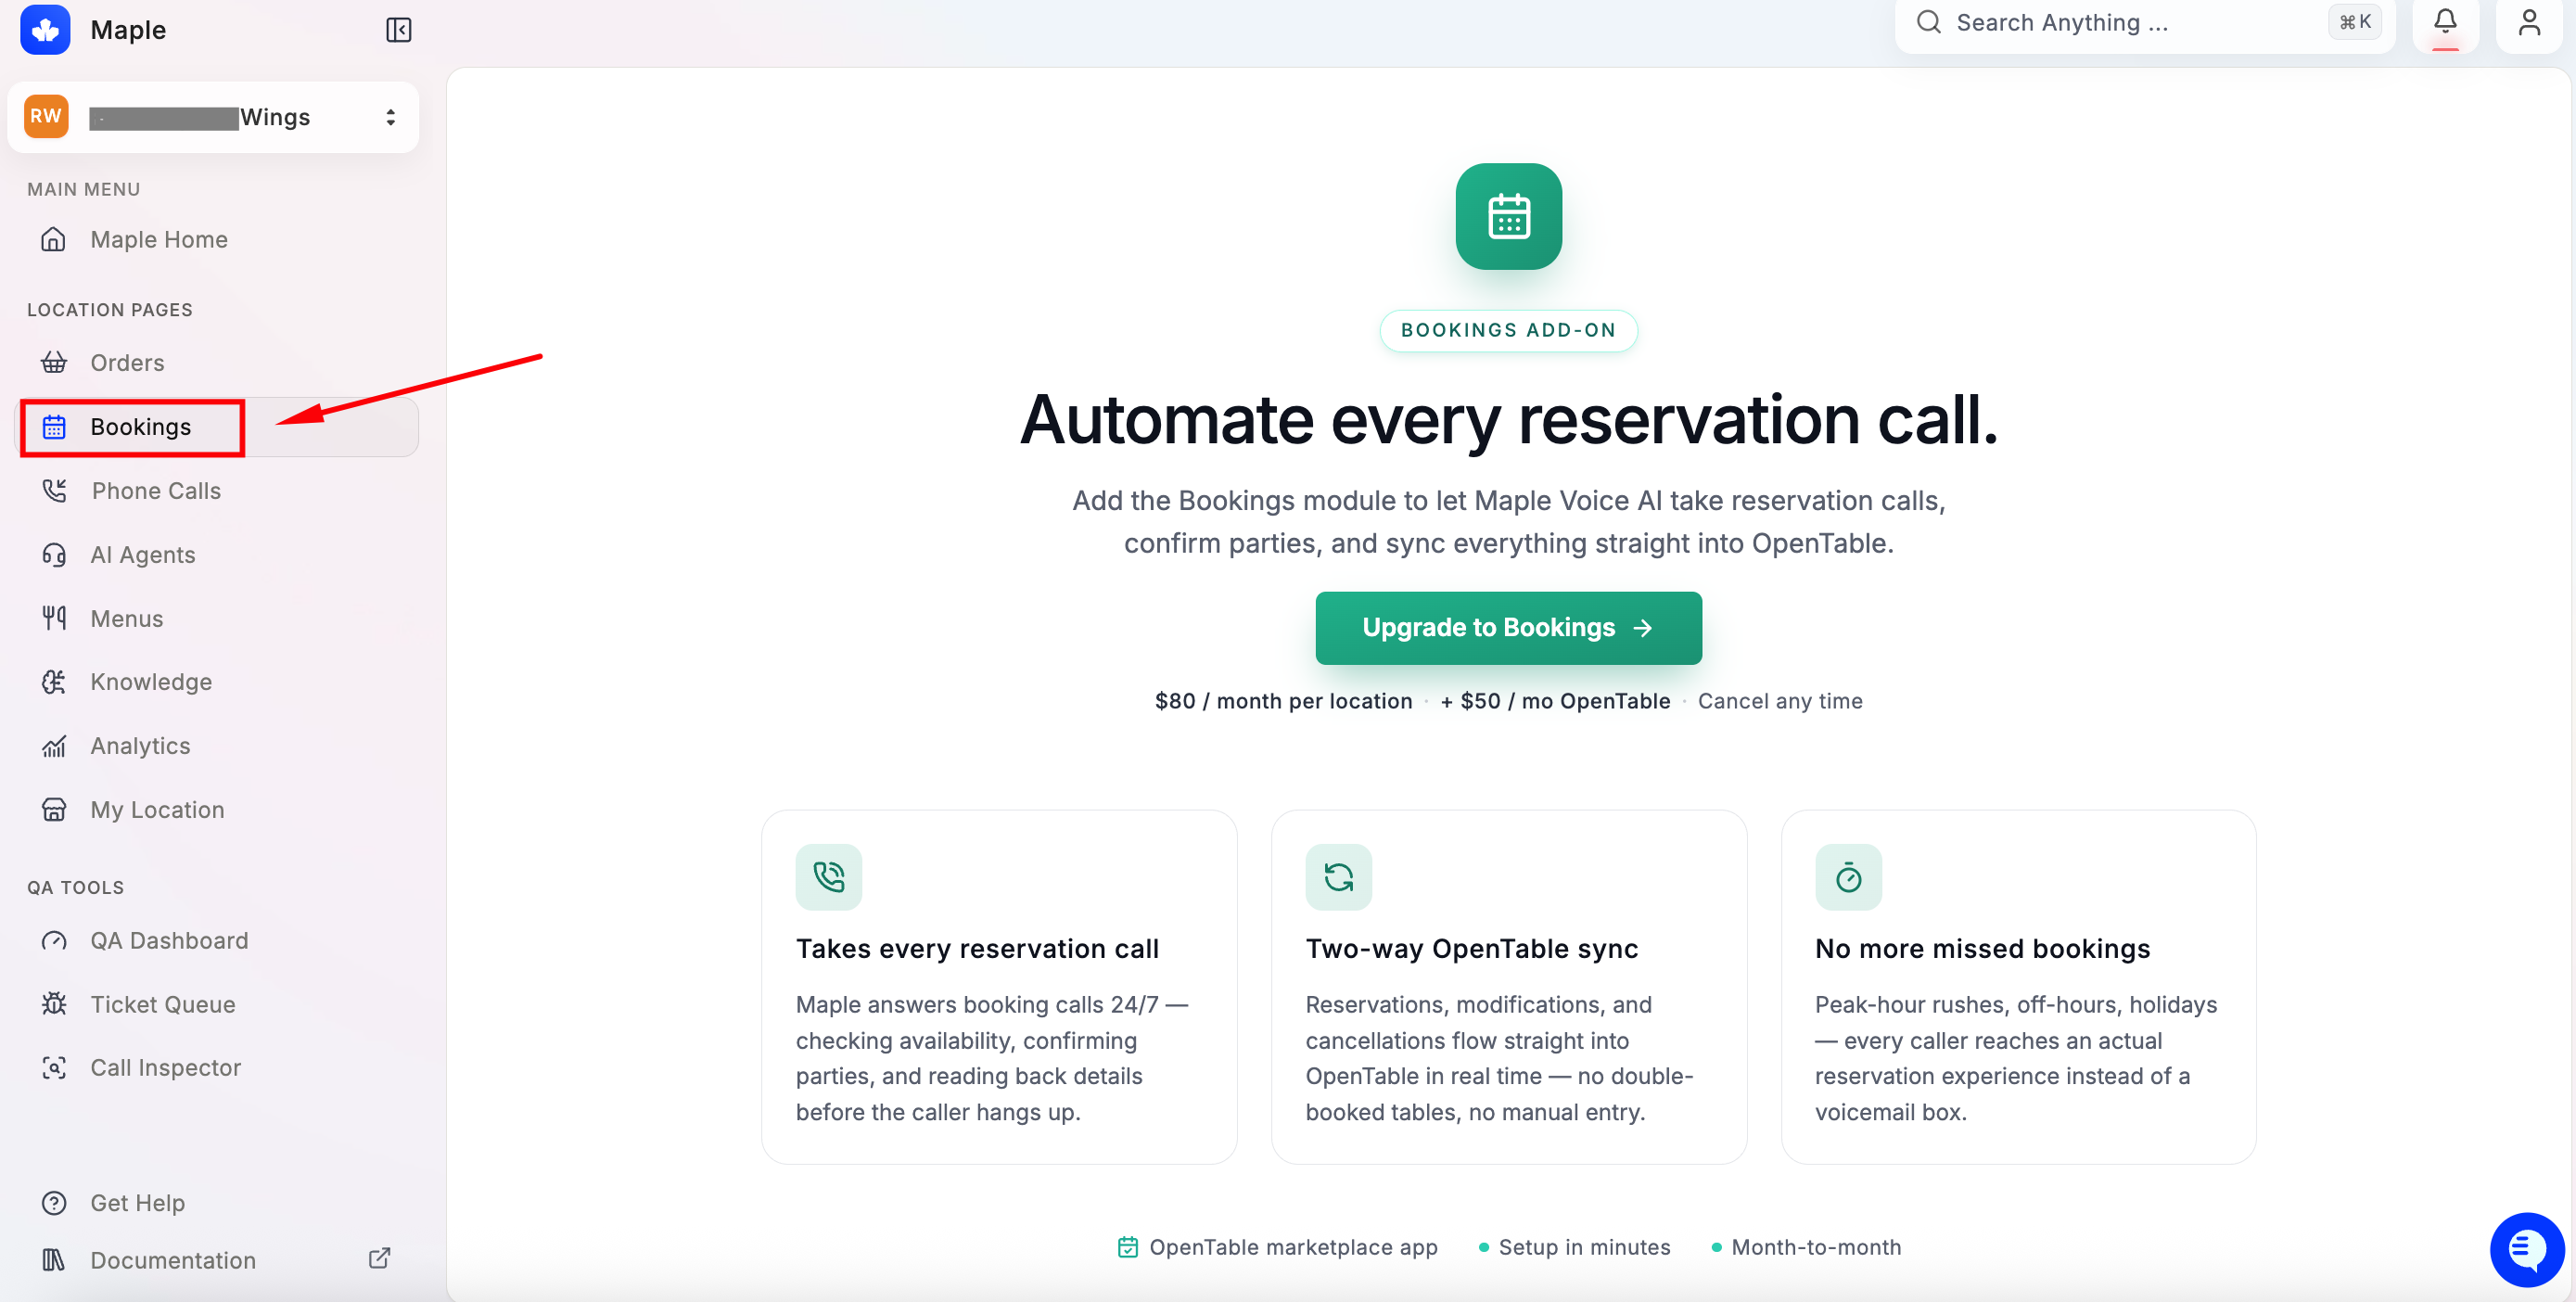
If your plan includes reservations (Maple Pro), this tab shows your reservations. Customers can book, modify, or cancel reservations over the phone. If you use OpenTable, reservations sync with your OpenTable account; otherwise Maple manages your tables and bookings itself (see Bookings).
If Bookings is not available on your plan, this page will show an upgrade option.
Step 5 — Phone Calls
Click Phone Calls to view every call your Maple agent has handled.
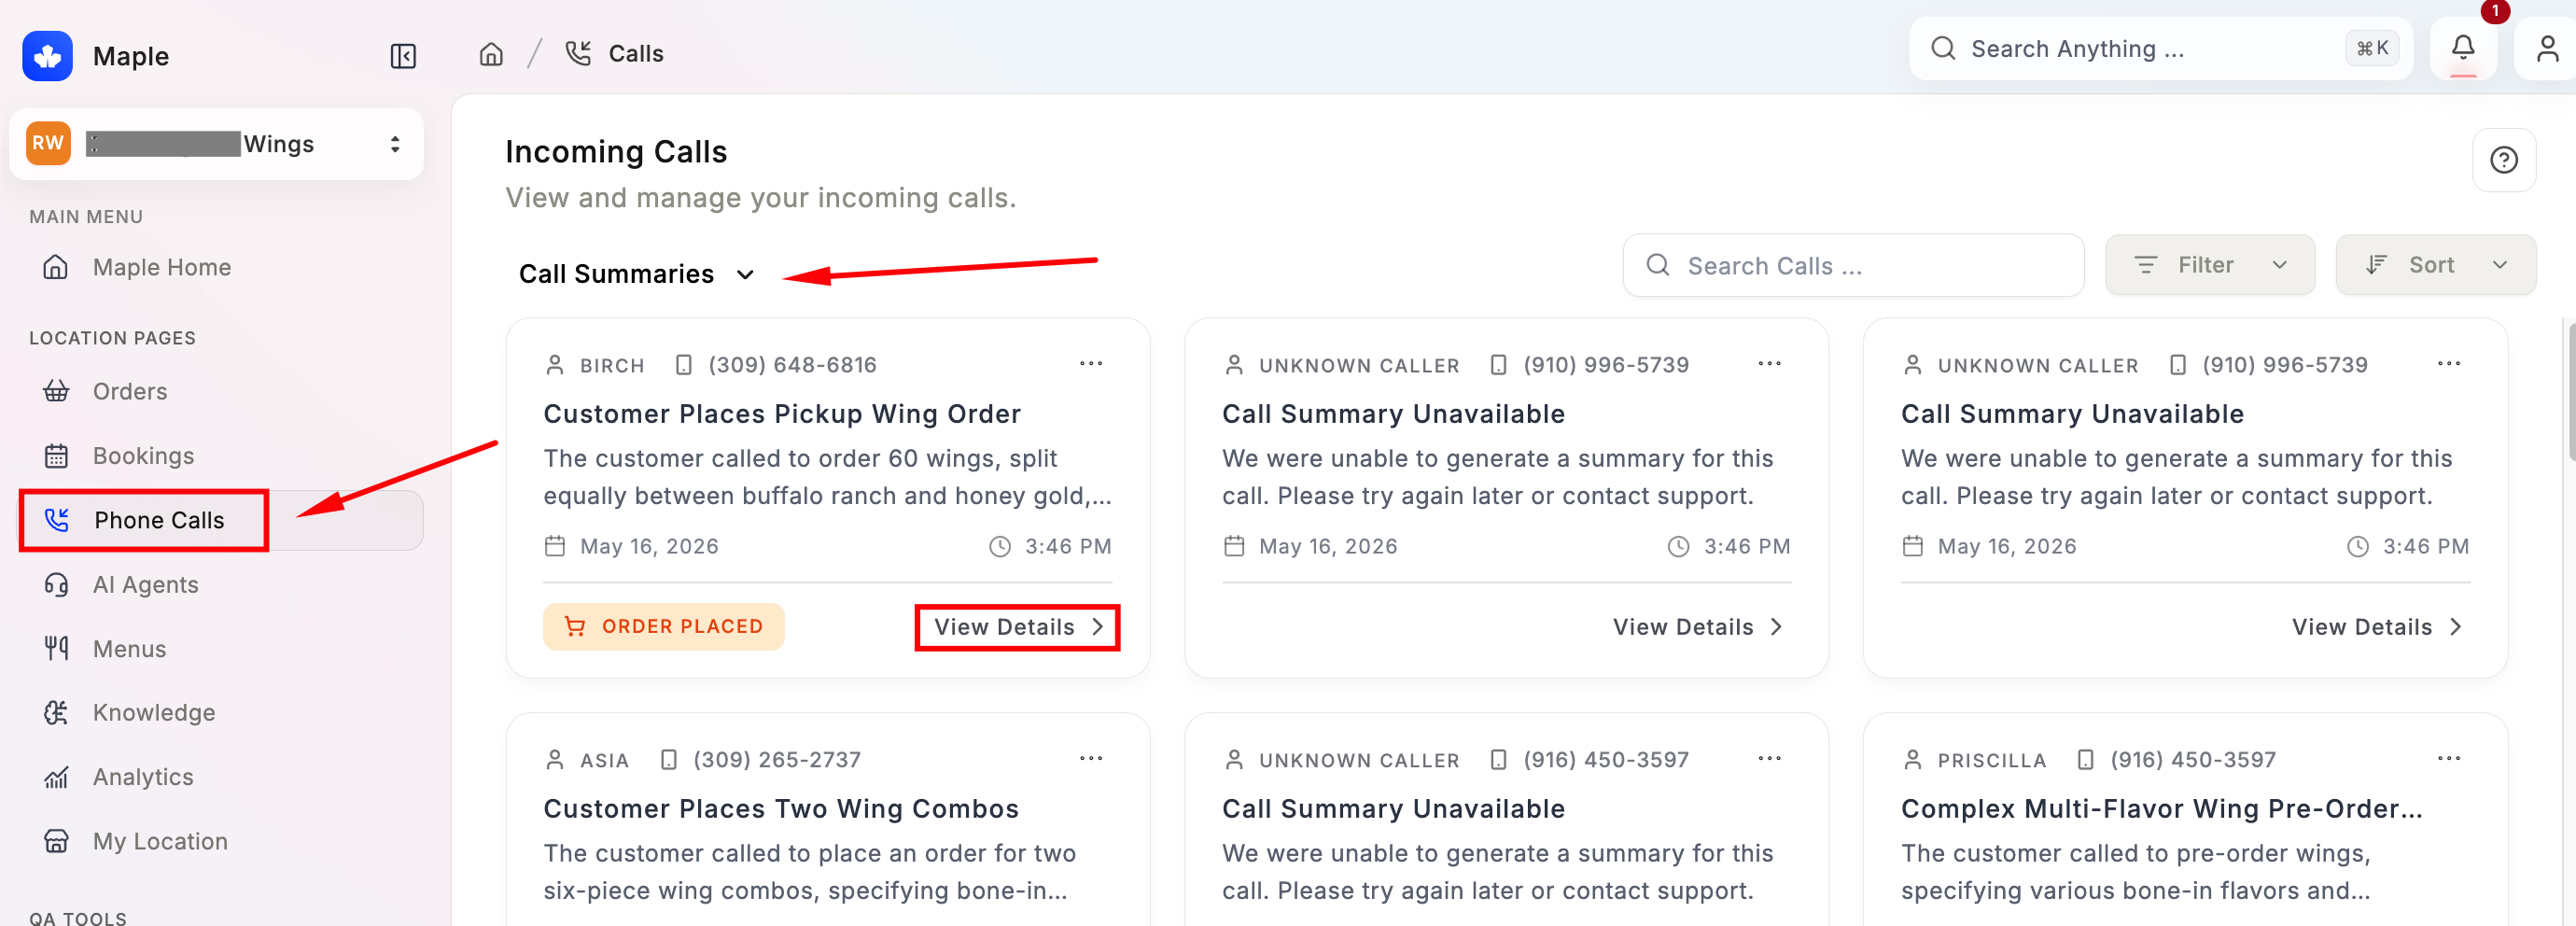
Each call card shows the caller’s name, phone number, a short summary of what happened, the date and time, and whether an order was placed.
Click View Details on any call to open the full Call Summary, which includes:
- Start time and call duration
- Customer phone number
- Call resolution — how the call ended
- Conversation Summary — a written AI summary of the full interaction
- Audio Recording — play or download the full call
- Call Transcript — complete written transcript of the conversation
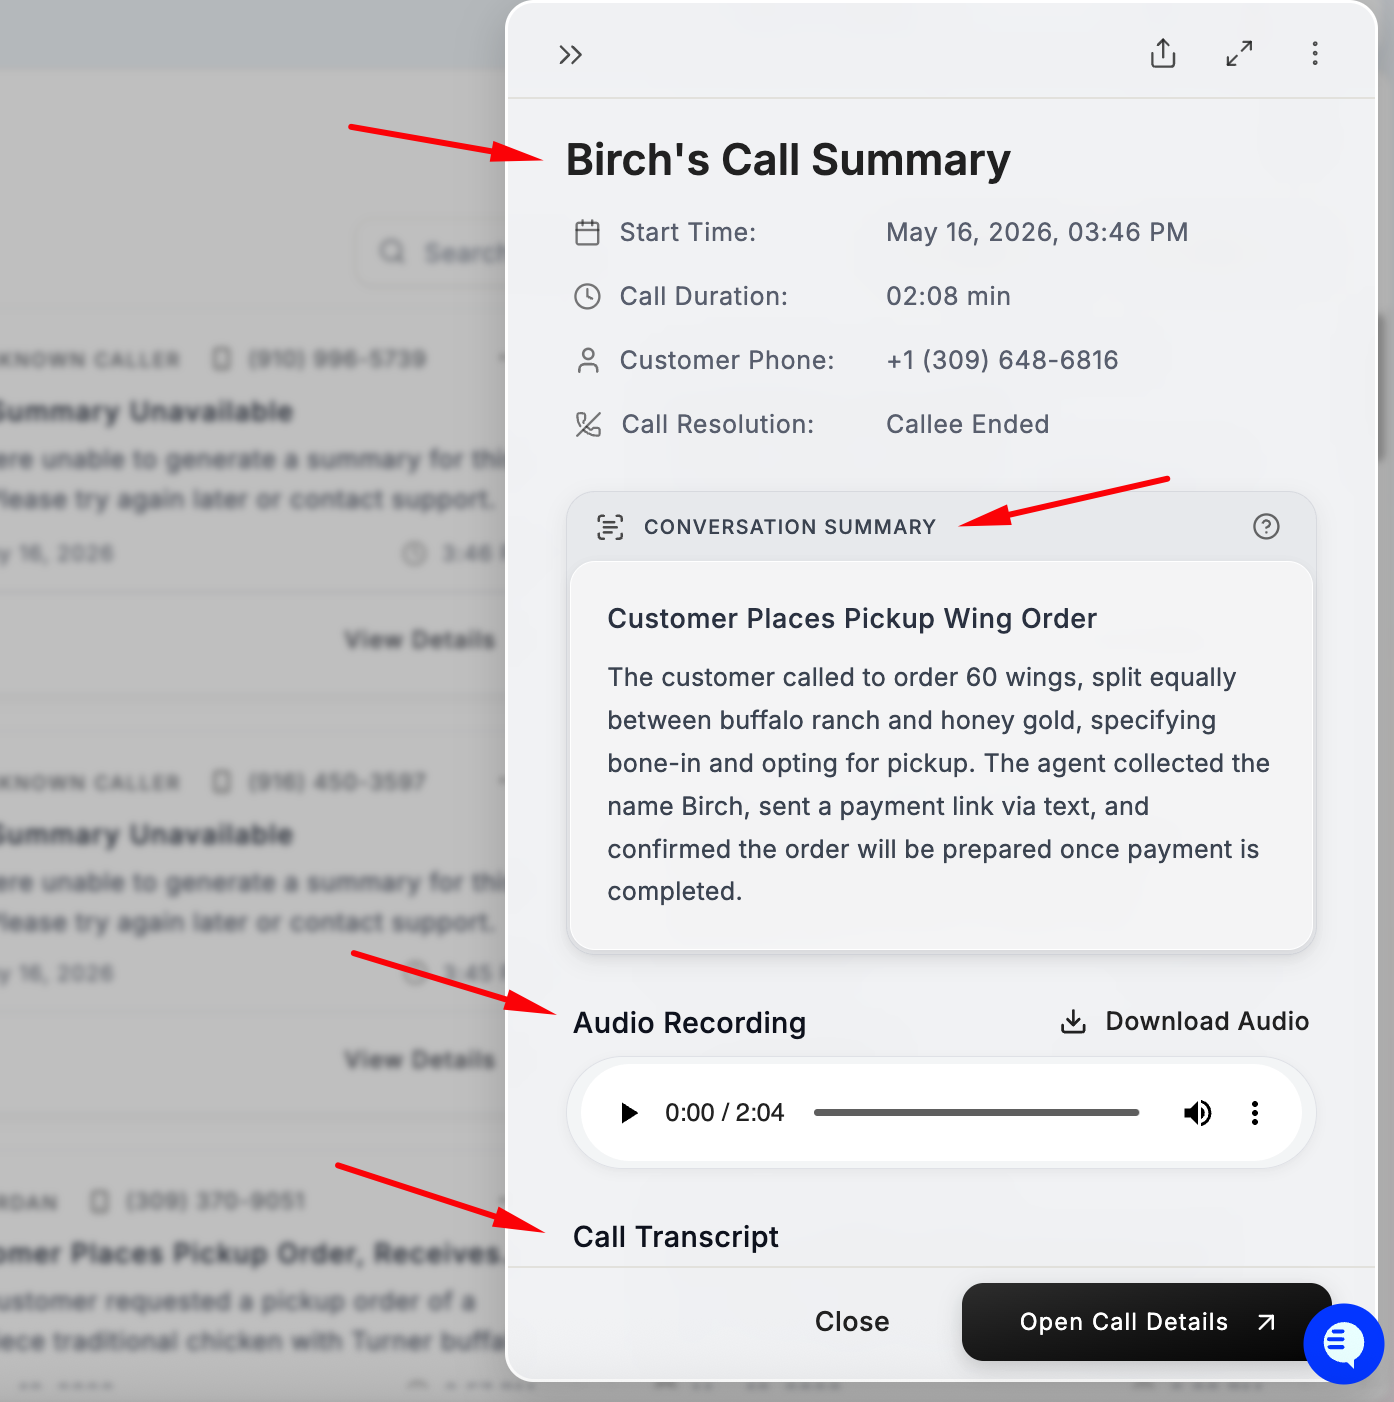
Use Phone Calls regularly to monitor quality, catch any errors, and improve your agent’s performance over time.
Step 6 — AI Agents
This is one of the most important tabs. Click AI Agents to view and configure your Maple voice agent. Click on your agent to open its settings panel.
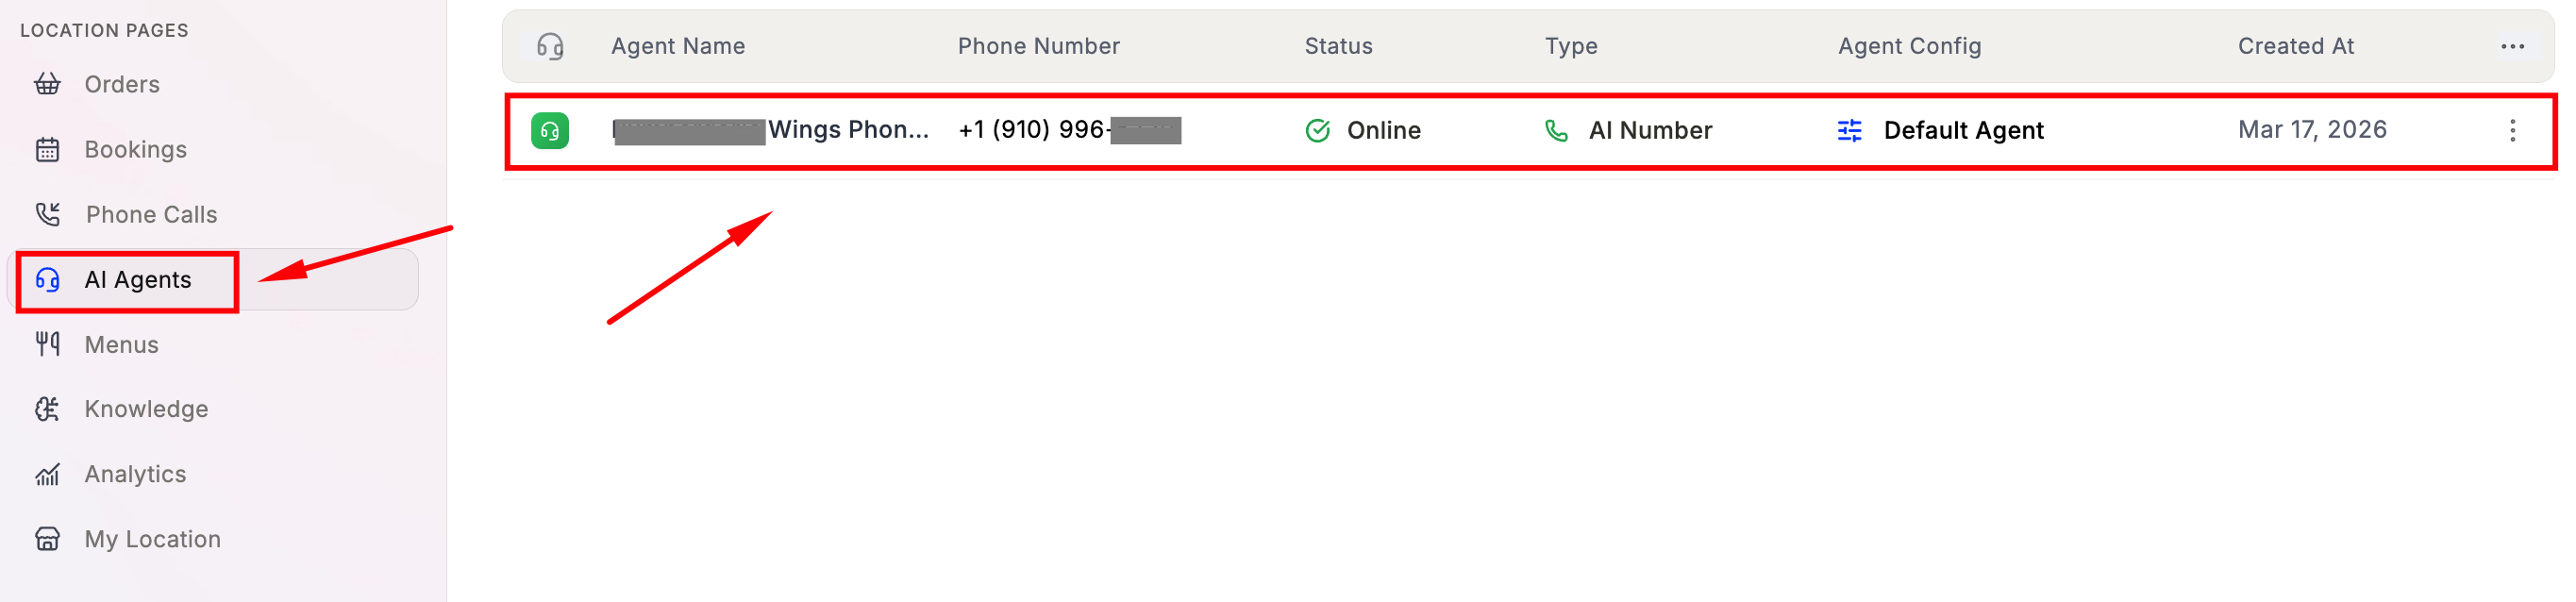
Inside the agent settings, there are six tabs:
Message
Set your Welcome Message — the first thing customers hear when they call. Keep it short, warm, and direct.
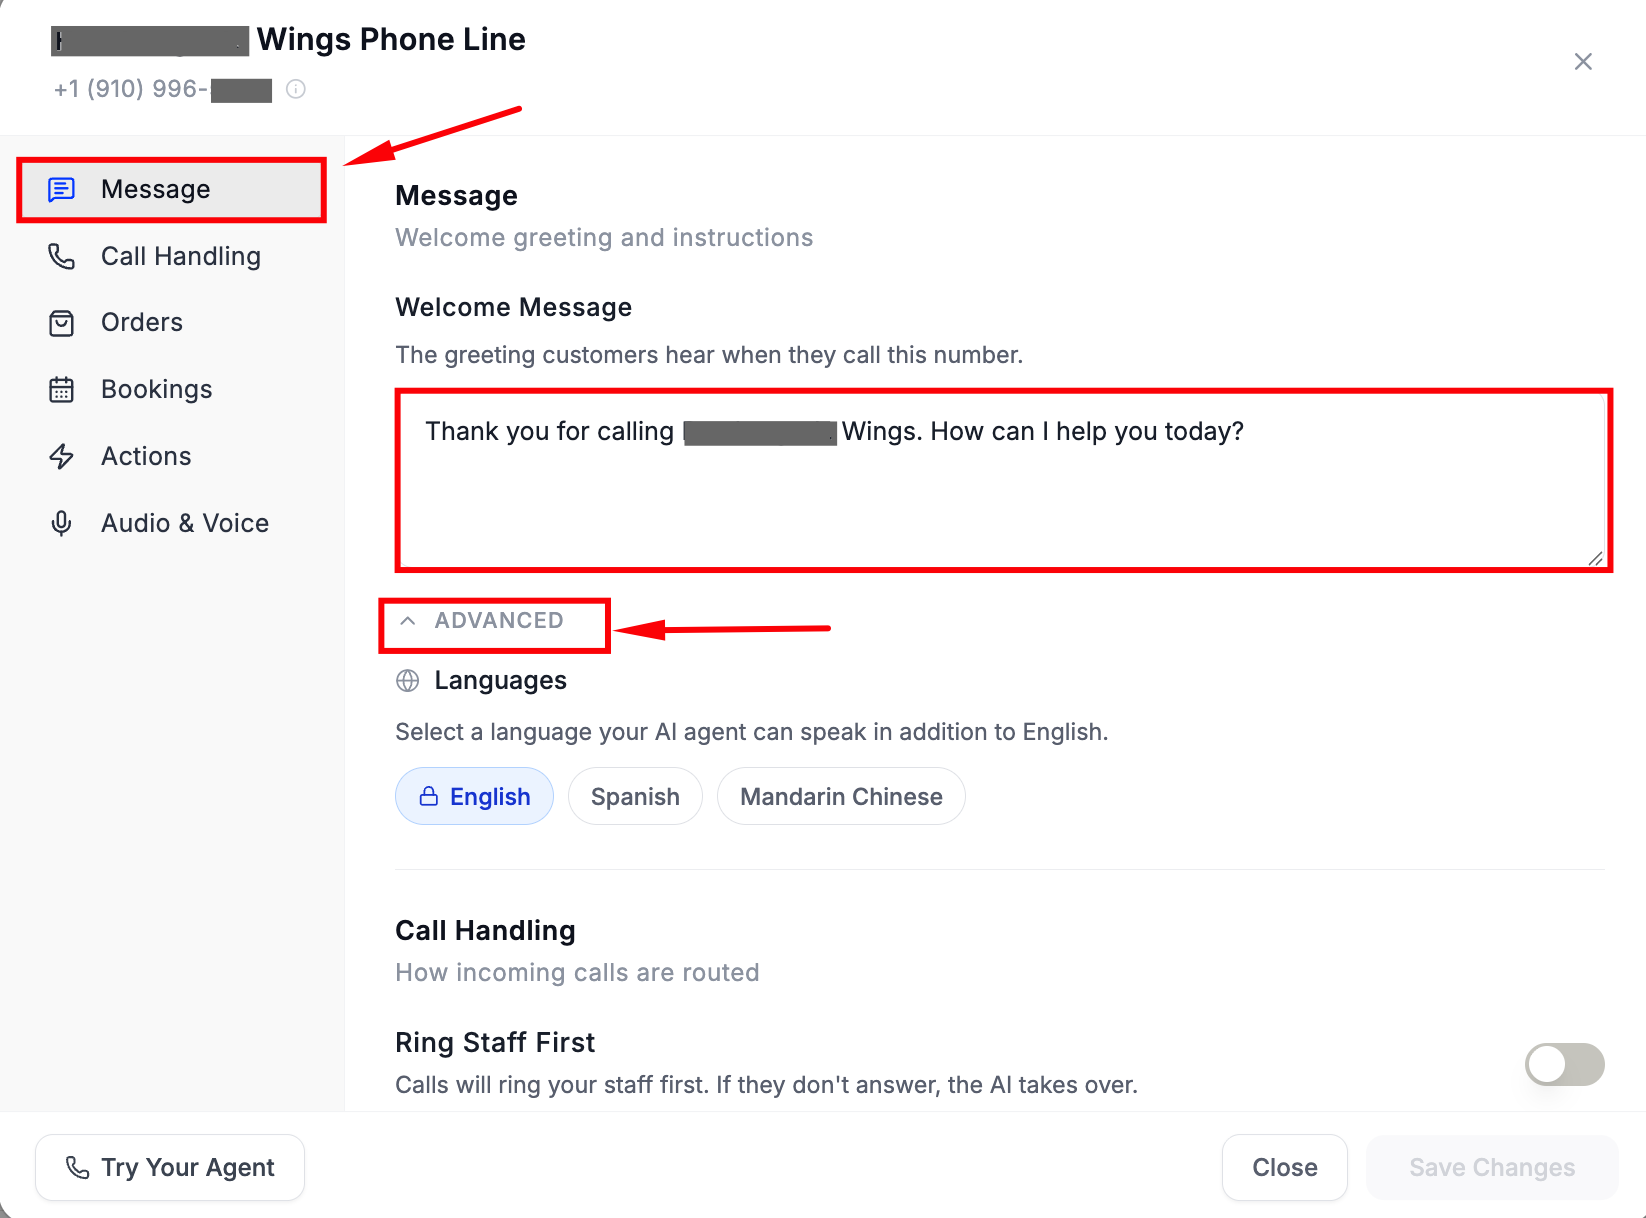
Under Advanced, select additional languages your agent can speak. Options include English, Spanish, Mandarin Chinese, French, and Korean. Languages other than English are marked Beta. Cantonese appears for accounts with beta access.
Call Handling
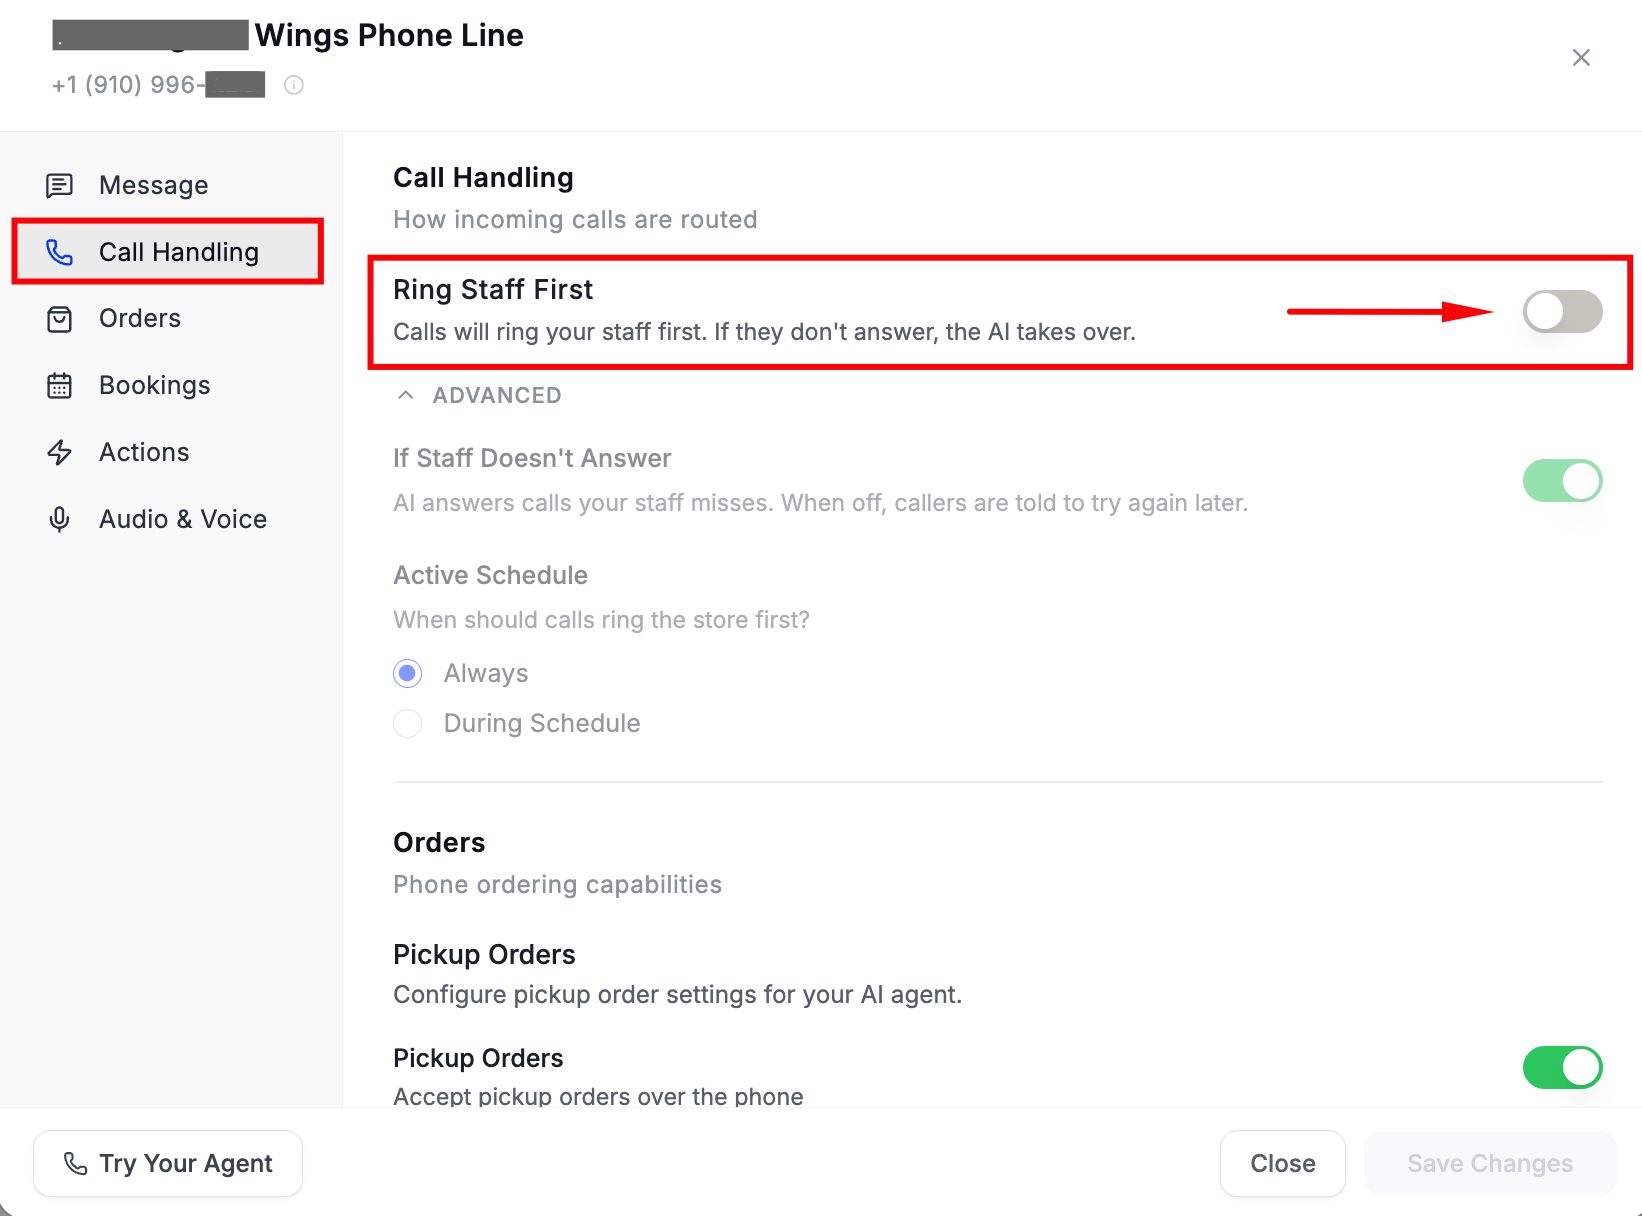
Controls how incoming calls are routed.
- Ring Staff First — when enabled, calls ring your staff first. If no one answers, the AI takes over. When disabled, Maple answers all calls immediately.
If enabled, you can also configure the following settings:
- If Staff Doesn’t Answer — when on, the AI handles any missed call. When off, callers are told to try again later.
- Active Schedule — choose whether Ring Staff First applies always or only during specific hours.
Orders
Configure your phone ordering behavior:
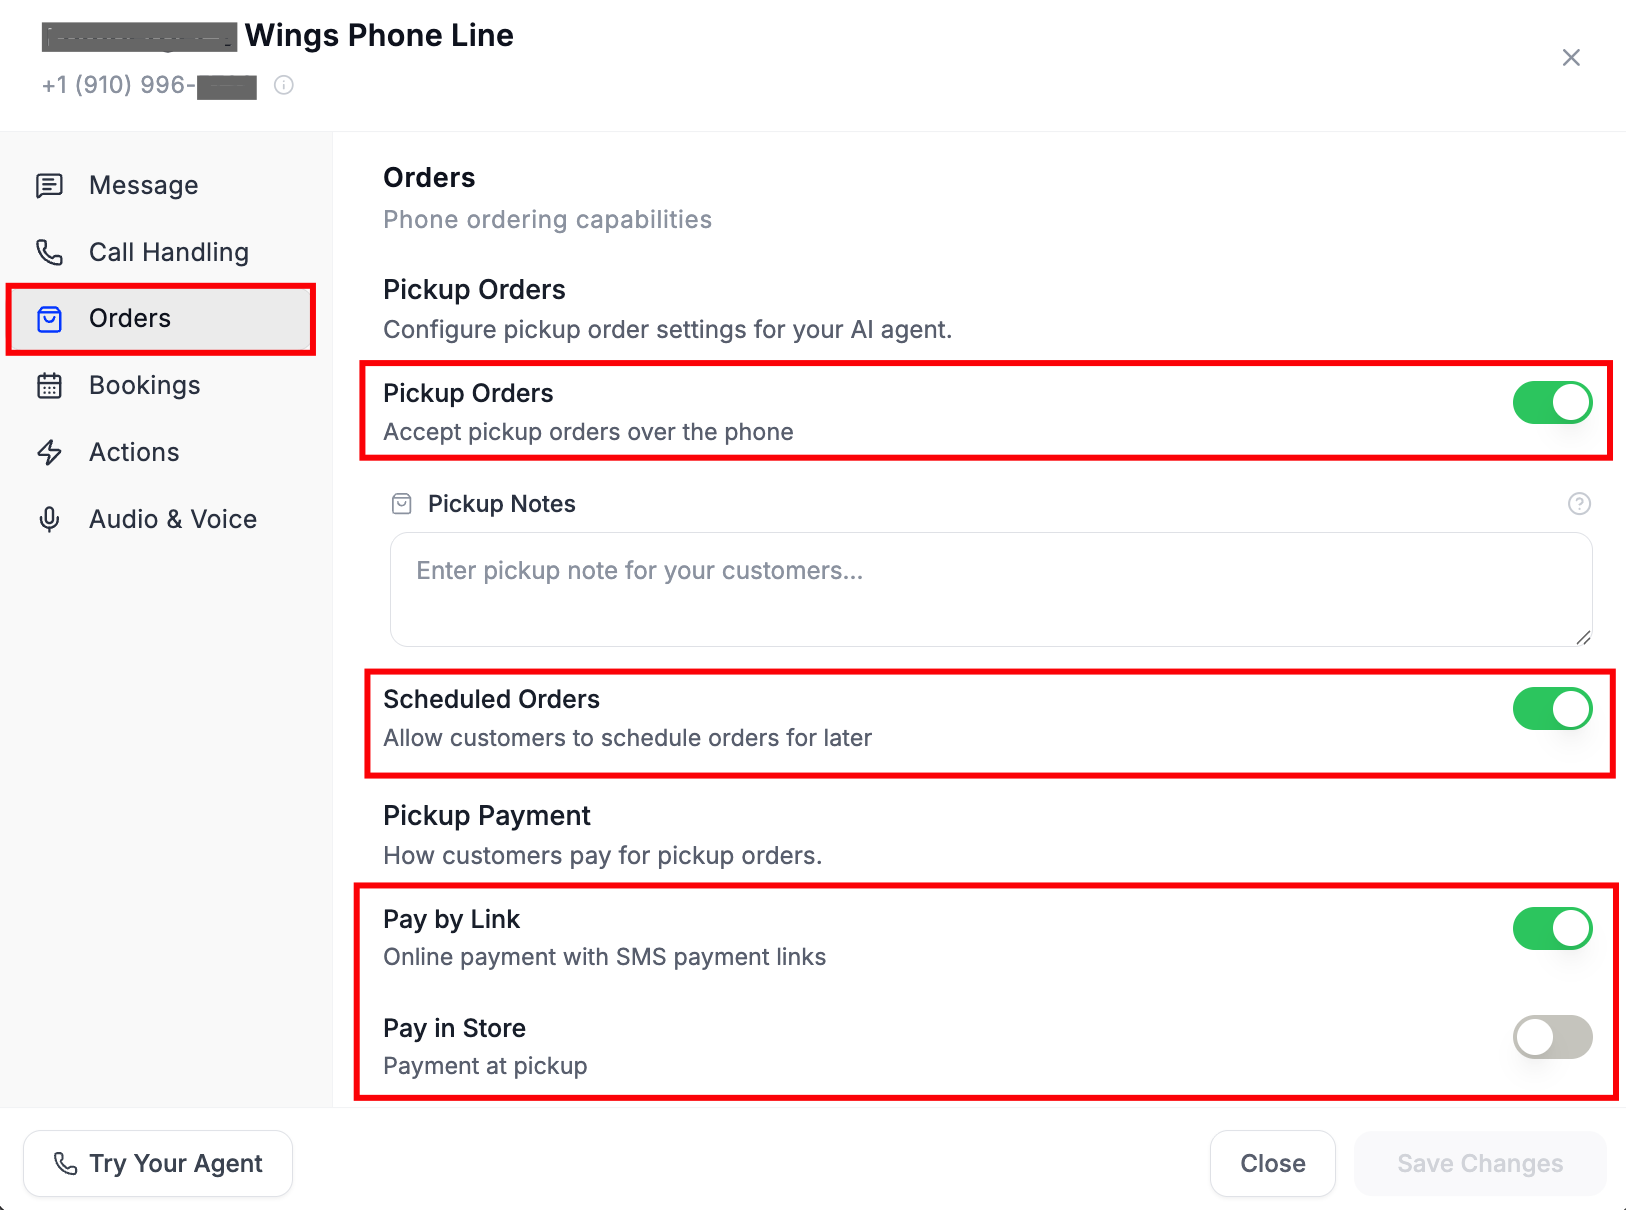
- Pickup Orders — toggle on to accept pickup orders over the phone
- Pickup Notes — add a note that appears on every pickup order
- Scheduled Orders — allow customers to place orders for a later pickup time
- Pickup Payment — choose how customers pay:
- Pay by Link — Maple sends an SMS payment link. The order goes to the kitchen once paid.
- Pay in Store — order goes straight to the kitchen. Customer pays at pickup.
You can enable both options so customers can choose how they’d like to pay.
Important: Pay by Link orders show as Pending until the customer pays via the SMS link. Only paid orders are sent to your kitchen. Pay in Store orders go straight to the kitchen at the time the order is placed.
Bookings
If your plan includes reservations (Maple Pro), enable Phone Reservations here to let customers book, modify, or cancel reservations over the phone. If Bookings isn’t available on your plan, you’ll see an upgrade prompt.
Actions
Configure what your AI agent can do during calls.
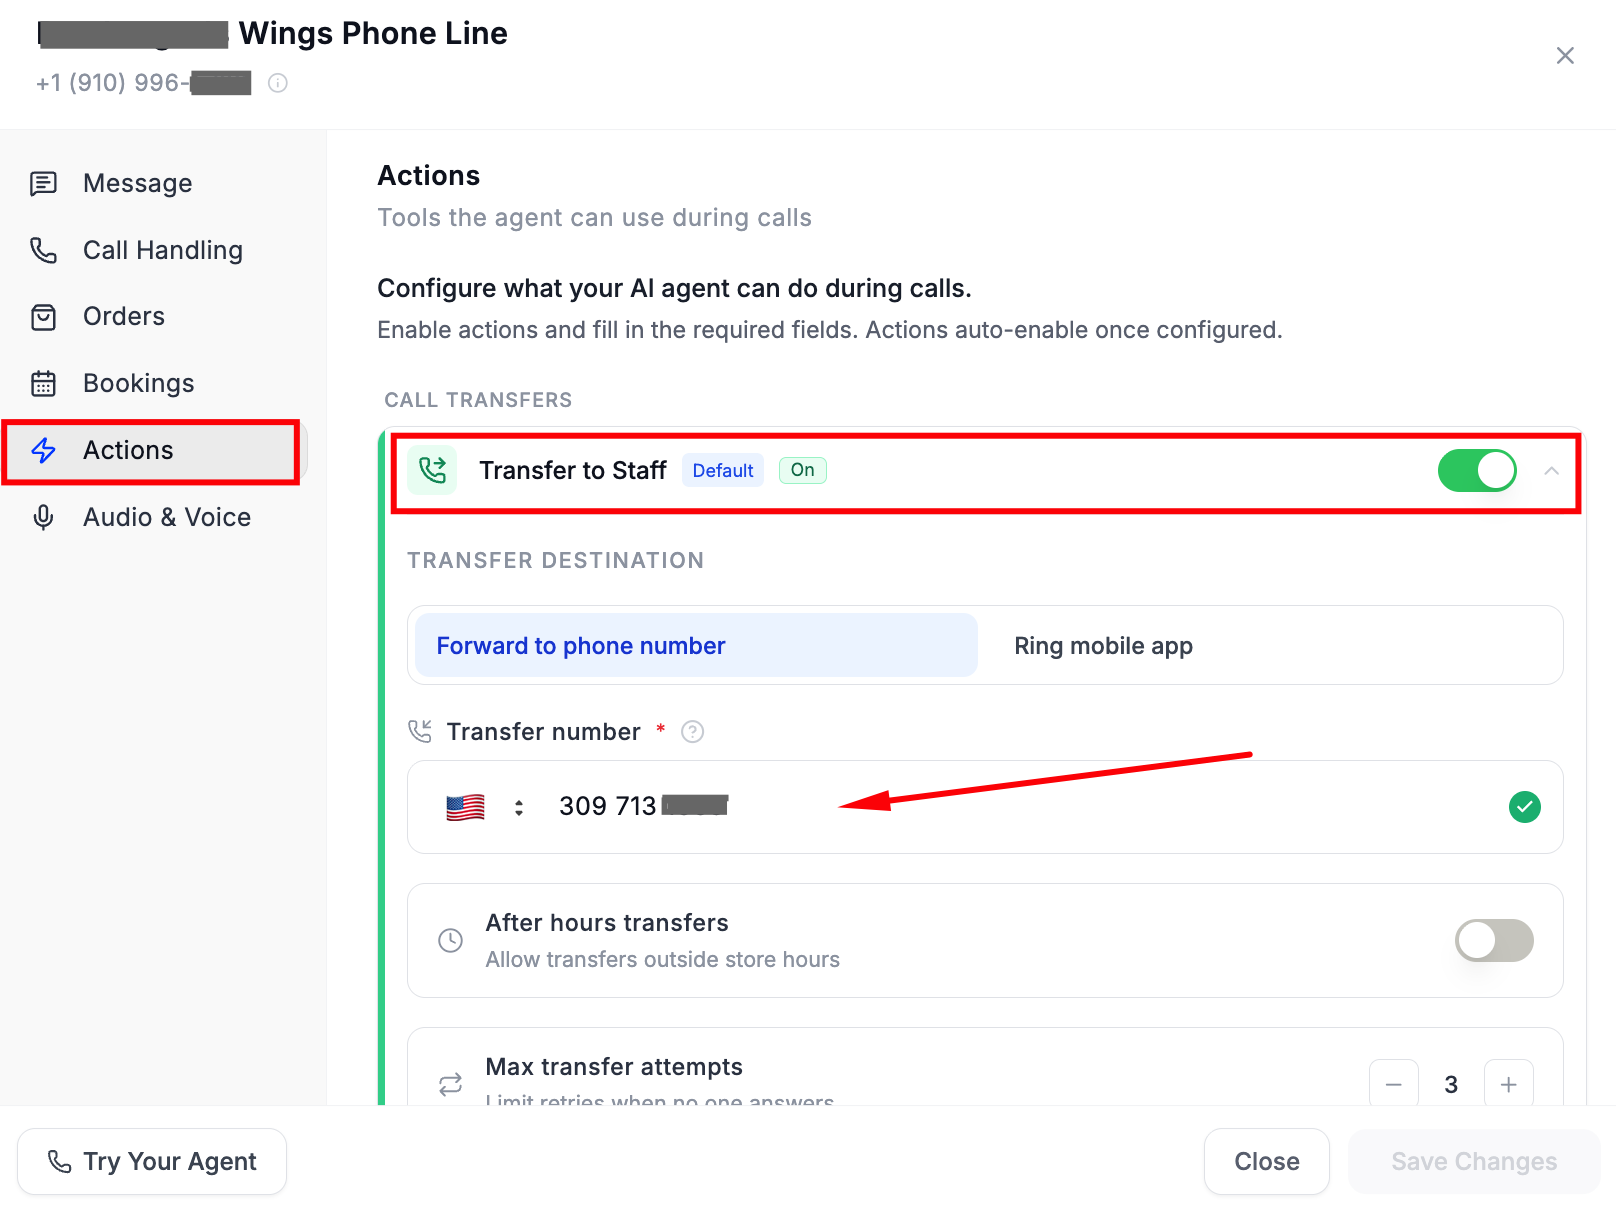
Default action:
- Transfer to Staff — enabled by default. Set your transfer number, max transfer attempts, and whether after-hours transfers are allowed.
This is the number customers are redirected to when they ask to speak to someone at the restaurant. Your transfer number must be different from your main restaurant line — if they match, Maple will pick up the call again instead of your staff, creating a loop.
Additional actions — click + Add Action to enable:
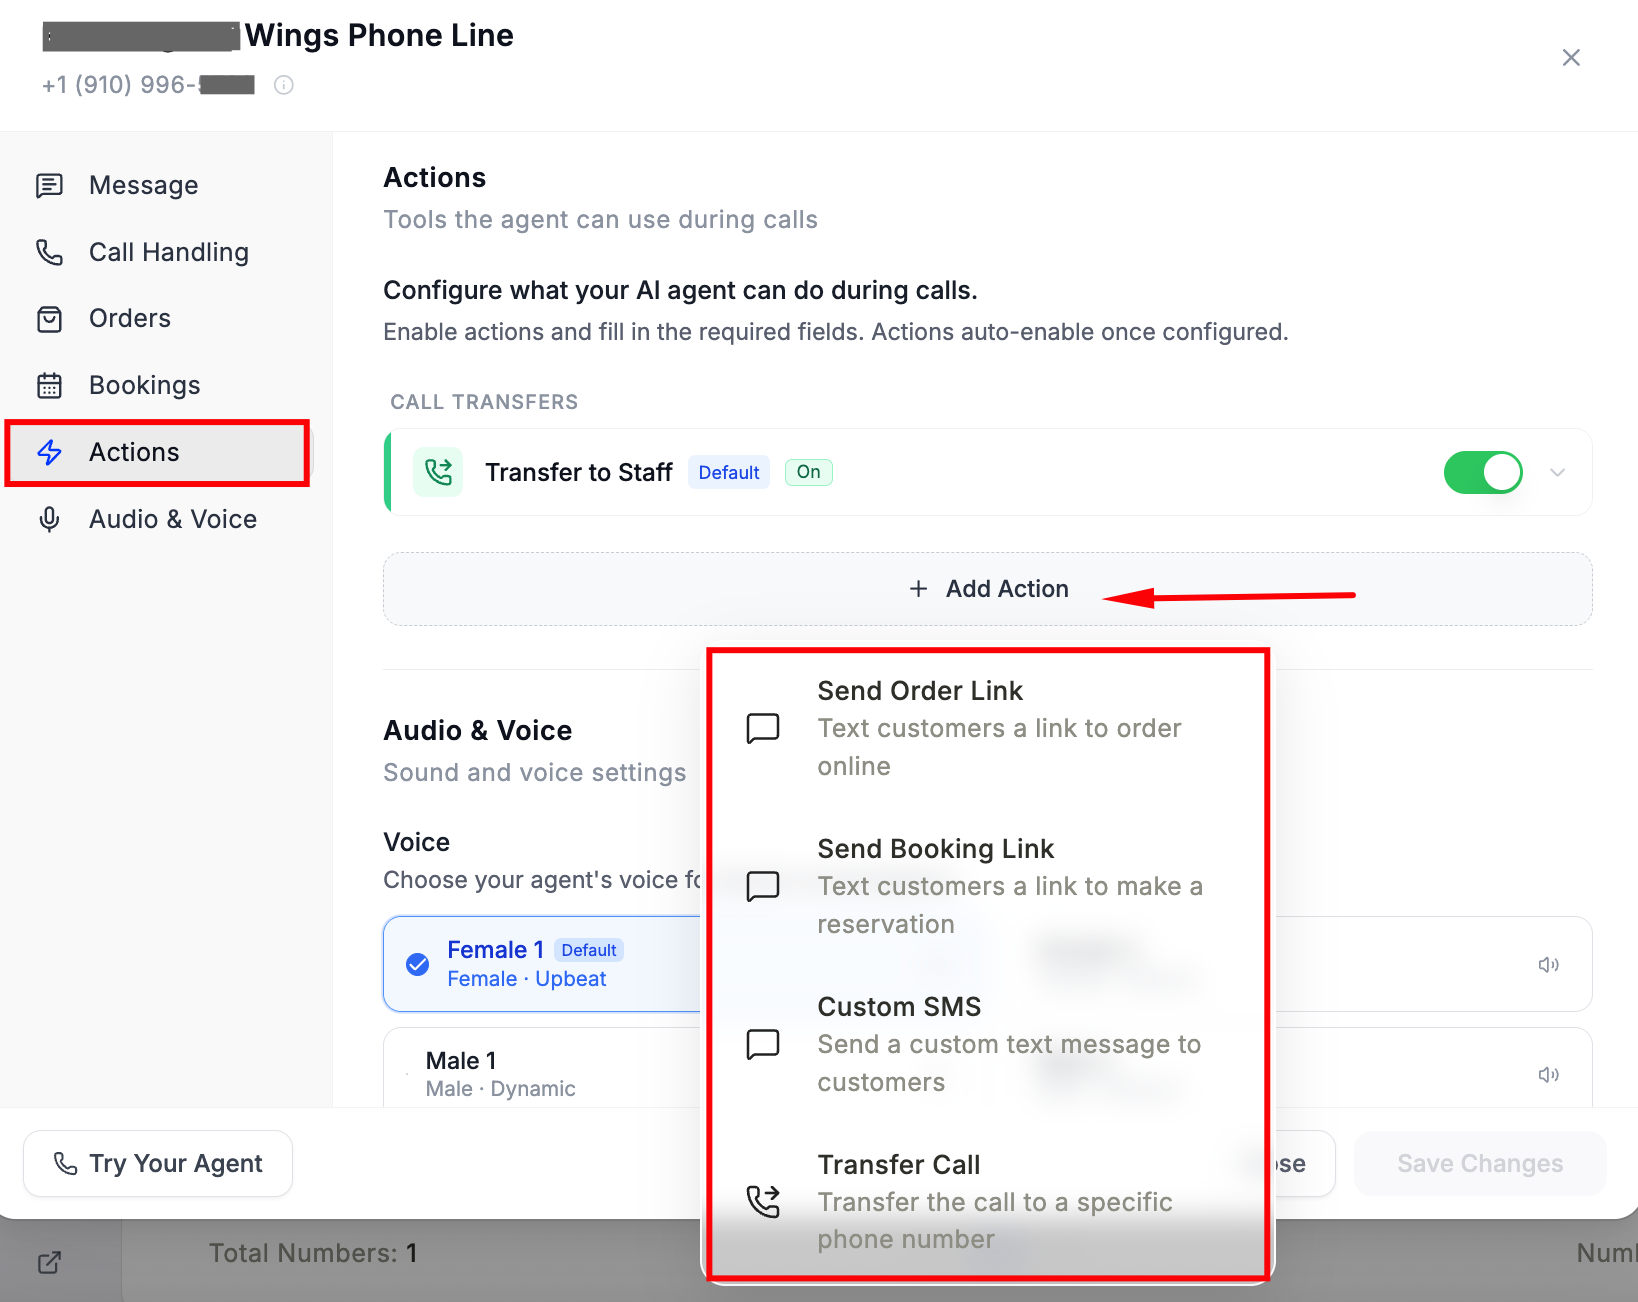
- Send Order Link — texts the customer a link to order online
- Send Booking Link — texts the customer a link to make a reservation
- Custom SMS — sends a custom text message to the customer
- Transfer Call — transfers the call to a specific phone number (catering, reservations, etc.)
Missed Call Notifications alert your staff to transfers they don’t pick up (see SMS notifications for missed transfers).
Note: To set up Custom SMS, you’ll need to provide your legal business name and EIN for carrier verification. Reach out to our support team at hello@maple.inc to get this configured.
Audio & Voice
Choose your agent’s voice. Six voices are available (Female 1–3 and Male 1–3):
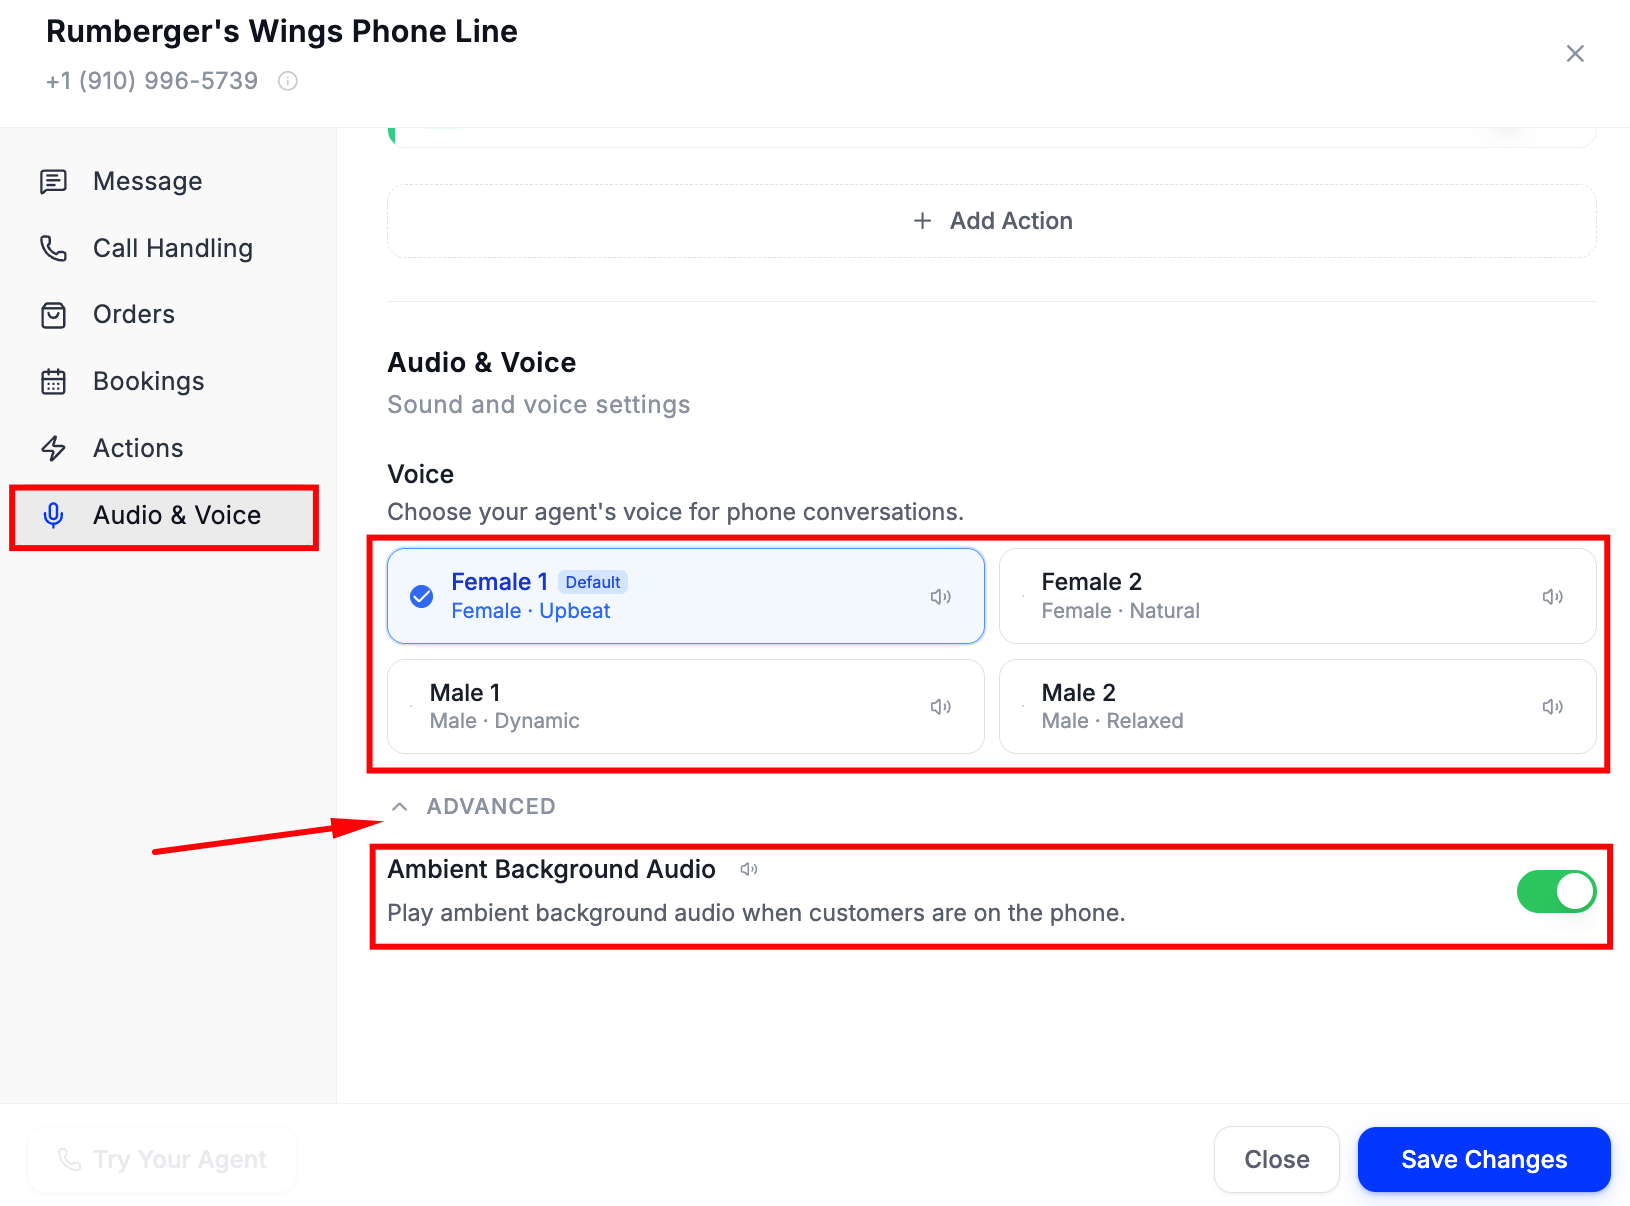
Click the speaker icon next to each voice to preview before selecting.
Under Advanced, enable Ambient Background Audio to play soft background sounds during calls for a more natural experience. Click Save Changes when done.
Use Try Your Agent at the bottom left to test before going live.
Step 7 — Knowledge Base
Click Knowledge to manage the information your agent uses to answer customer questions beyond the menu. The page has three tabs: Overview, All Entries, and Behaviors (the AI coaching behaviors your agent follows).
Each entry has a Question and an Answer. Examples:
- “Are you open on Thanksgiving?” → “We are closed on most major holidays…”
- “Do you offer delivery?” → “Yes, we deliver via…”
- “Do you have parking?” → “Yes, free parking is available…”
To add a new entry, open the All Entries tab, then:
- Type your question in the Question field
- Type the answer in the Answer field
- Click Add entry
Click Add Template and choose Restaurant or Salon to add a pre-built set of entries as a starting point. Replace any bracketed text, like [xx], with your own details.
Aim for at least 10 knowledge base entries before going live. The more context your agent has, the better it handles real conversations.
For the full guide, see Knowledge Base.
Step 8 — Analytics
Click Analytics to track how Maple is performing for your restaurant.
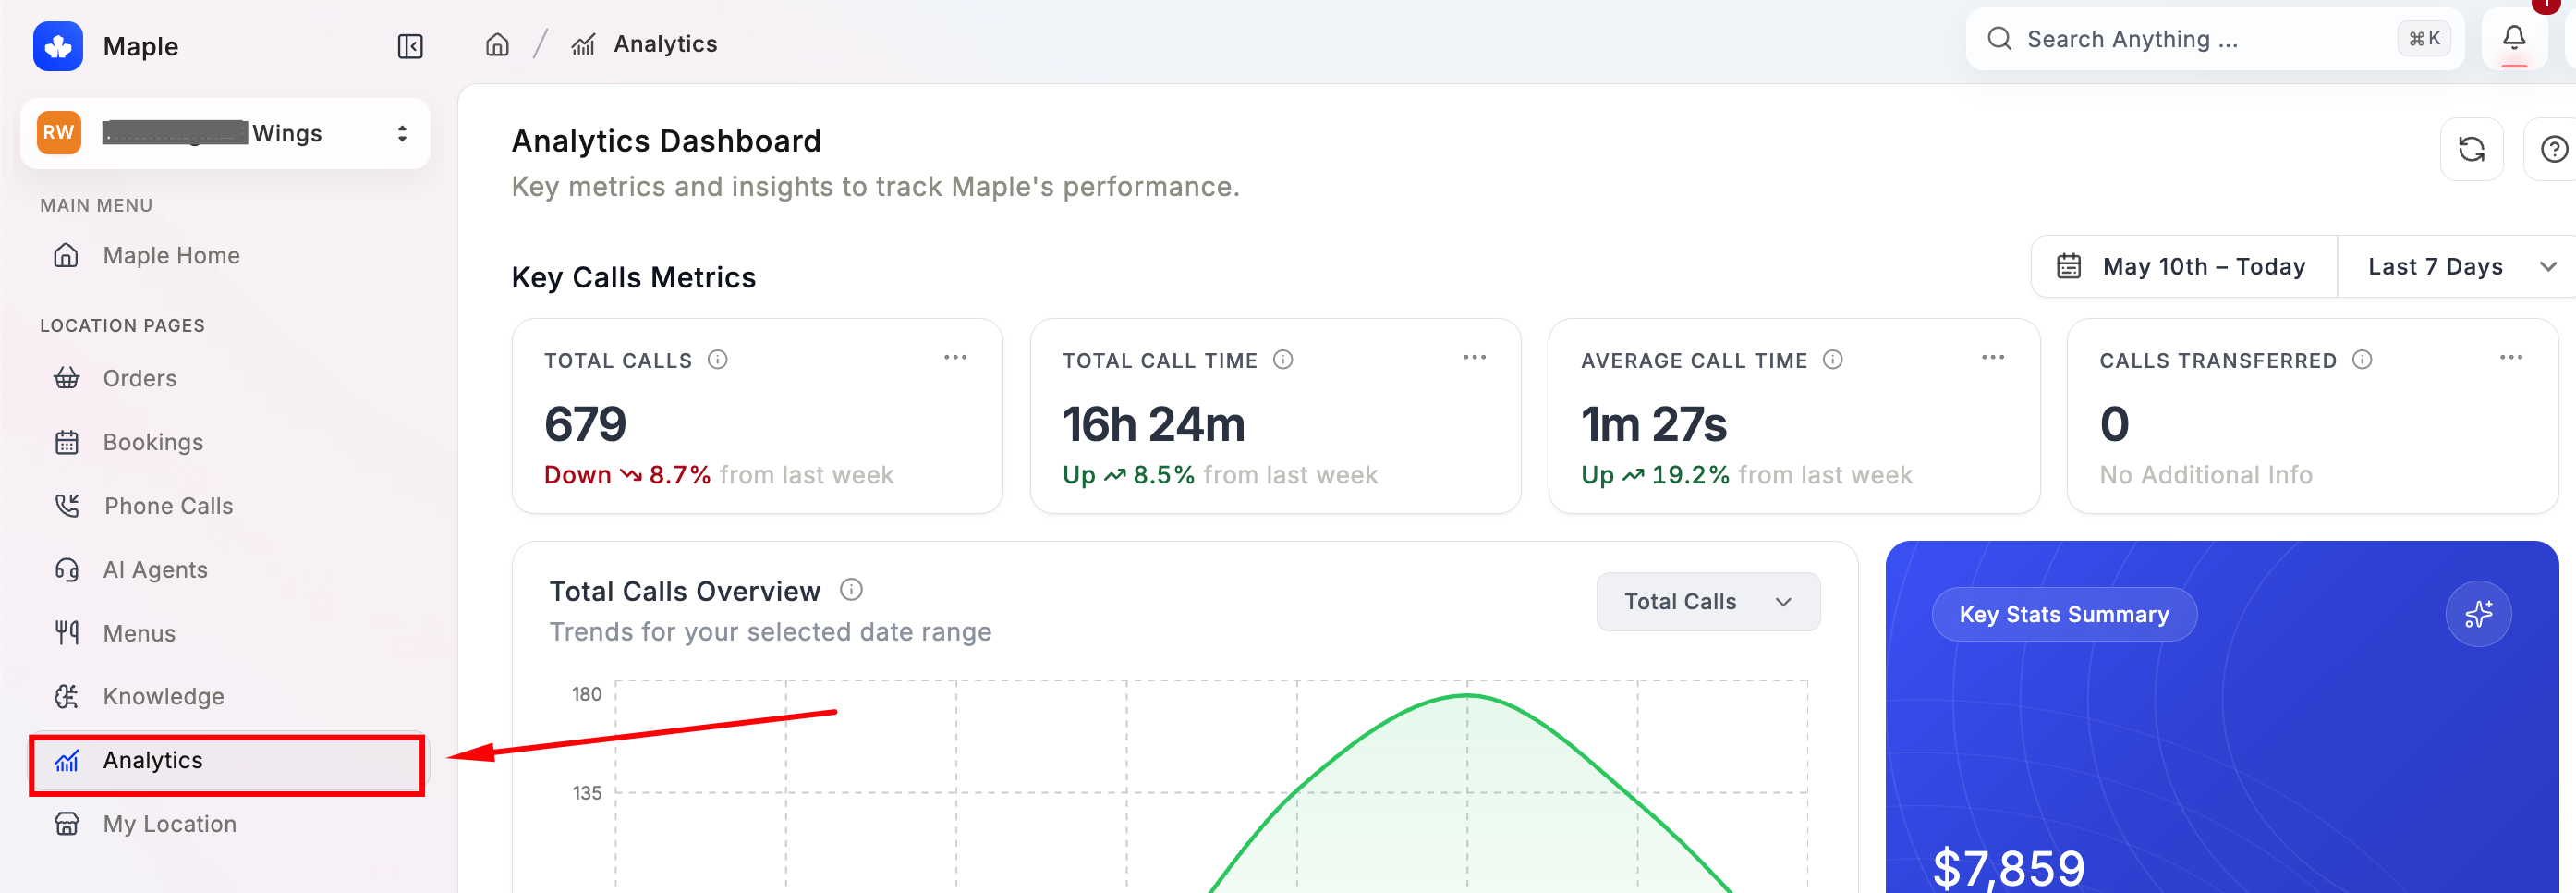
The Analytics Dashboard shows key metrics for your selected date range:
- Total Calls — total number of calls handled by Maple
- Total Call Time — combined duration of all calls
- Average Call Time — average length per call
- Calls Transferred — how many calls were handed off to your staff
The Total Calls Overview chart shows call volume trends over your selected period. You can filter by Last 7 Days, Last 30 Days, and other date ranges.
The Key Stats Summary card shows a high-level financial snapshot, including total sales volume processed through Maple.
Check Analytics regularly — especially during your first few weeks live — to understand your call patterns, peak hours, and how well orders are converting.
Step 9 — My Location
Click My Location to manage your restaurant’s location details.
Here you’ll find:
- Restaurant name and address
- Business hours — your general operating hours (separate from menu hours — see Step 2 for the difference)
- Location, phone number, and website.
Keep this information up to date — your agent uses it to answer questions and determine when to take orders.
Nearly every setting here (welcome message, transfer numbers, store hours, menu items, and knowledge base entries) can be changed at any time without contacting support.
When you’re ready to test your agent and switch on call forwarding, head to Going Live.